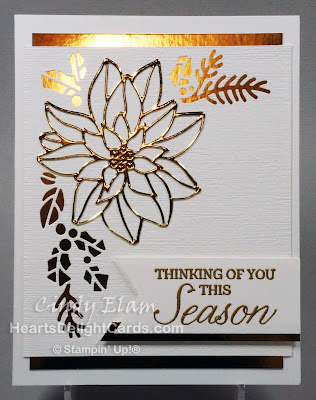
I just love the combination of white with gold, don't you? It looks so elegant, and I thought this would be a perfect combo to use with the Detailed Poinsettia Thinlits Dies. I borrowed the greeting from Winter Woods because I thought the combination of fonts looked good with this design.
After cutting the 4" x 4-5/8" Whisper White panel with the pine/holly die, it was embossed with the Subtle Dynamic folder. The gold poinsettia was cut from the 3-3/4" x 5" foil background, taking care to place it where the cuts wouldn't show through the pine/holly cuts in the white panel.
The poinsettia was glued to the embossed die cut panel. I left the center stamen pieces in the die cut. The foil piece was adhered to the back and the whole thing then adhered to the card base.
After the greeting was heat embossed in gold, the banner end was cut with the Banner Triple Punch. There was a strip of gold foil laying on the desk and out of curiosity I held it behind the greeting banner. It looked good, so it got added as an afterthought! Then the greeting was popped up on dimensionals on the card.
The Detailed Poinsettia dies are so easy to use, and you can cut the inner detail and the outline at the same time! I thought it would be fun to go for the glitz on the next card, so I cut the poinsettia out of Merry Merlot glimmer paper (in the Joyous Noel Glimmer pack) and used Tranquil Tide glimmer as the back drop for the pine and holly cut outs.
This time I did use a greeting from the Peaceful Poinsettia stamp set that coordinates with the dies. Some gold metallic pearls were added to the center because, well.... more is more, right?
So there you have two cards; one kind of classy and one kind of glitzy. Which one do you like best?
Product List


Awesome cards. Just got this set and am going to use your ideas. Thank you so much for sharing.
ReplyDeleteThank you so much, Ina! It really is such a pretty set. 😊
Delete