As promised, here is the tutorial for the Ferrero Rocher treat holder. It really is pretty simple, as you will see once you have put it together! If you need to see a close-up view of any photo, click on it to enlarge.
Materials and Tools
- Cardstock: 3-1/4" x 5-3/8" (I like the sturdiness of Whisper White Thick, but any of our colored cardstock would work just as well. Note: You can get four treat bases from one sheet of 8-1/2" x 11" cardstock.)
- Designer Series Paper: 2" x 7-3/4" (Choose which side you want to show on the outside and place it face down on your scoring tool. Note: You can get eight treat covers from a 12" x 12" sheet of DSP.)
- Window Sheet: 1-5/8" x 1-7/8"
- Ribbon: It takes approximately 16" to tie a nice bow and trim the ends.
- Adhesives: Tear & Tape, and Glue Dots (I used retired Sticky Tape because it showed better in the photos.)
- Simply Scored Scoring Tool (You can use the Stampin' Trimmer and the small stylus end of the Take Your Pick Tool if you don't have a Simply Scored.)
- 1-3/8" Circle Punch (I used the old "whale tail" style of punch, which is retired along with the newer locking style. You can use the 1-3/8" Layering Circle Framelit and Big Shot, if needed.)
- Christmas Traditions Punch (or similarly sized punch/die)
- 1/8" Circle Punch
- Paper Snips
- Ferrero Rocher Candy (of course!)
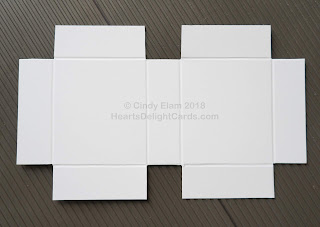
2. Rotate cardstock 90 degrees and place the long side against the top; score at 5/8", 2-3/8", 3", and 4-3/4".
3. Trim all the squares out as shown, leaving the long tabs.
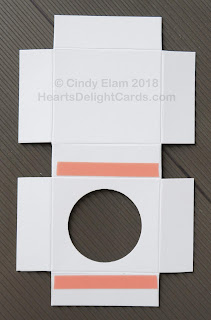
4. Slice the short end (either side) into the 1-3/8" Circle Punch as far as it will go. Make sure you have an even amount showing on the sides and punch the circle.
5. Add sticky tape as shown, making sure it's up to the score line on either side of the punched hole.
6. Turn the base over and add sticky tape to the back side at the edges of the three tabs around the punched hole.
7. Remove the tape liner on the three tabs and fold up into box, adhering tabs and forming the box. The first two strips of tape should be showing on the outside now. (The second strip is on the back side.)
8. Place the long edge of the DSP at the top of scoring tool, making sure it's firmly in place in the corner. Score at 5/8", 2-3/8", 3", 4-3/4", 5-3/8", and 7-1/8".
9. Slide either short end into the Christmas Traditions Punch as far as it will go. Make sure the sides are even and punch the window.
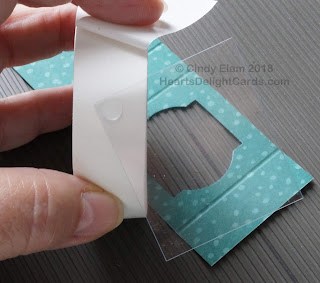
10. Adhere the Window Sheet to the inside using a Glue Dot at each corner. (Note: It's easier to use the Window Sheet (or any embellishment, for that matter) to pick up the Glue Dot, rather than trying to pick it up with your fingers or a tool and transfer it that way!)
11. Fold the treat cover as shown.
12. Remove the liners from the sides of the box and adhere the treat cover. Place the Ferrero Rocher into the hole. Add a dab of adhesive to keep the top edges even while punching the holes for the ribbon. Punch about 1/2" in from the sides using the 1/8" Circle Punch.
13. Thread the ribbon through the holes and tie a pretty bow. I used retired Whisper White Organza ribbon here. Trim the ends, add a tag if you want, and you're done!
I hope these instructions were clear enough that even a beginner will be able to successfully make these cute treats! Please leave a comment if you try it - I'd love to hear from you! And, as always, I'd be honored if you chose me to be your Stampin' Up! demonstrator.
Product List


Cindy...This is way too cute! Love the papers
ReplyDeleteThanks, Sally! Hope you are well. 😊
DeleteLove this detailed tutorial! You make it look so easy and fun.
ReplyDeleteThis is an awesome treat box. Thanks for sharing your wonderful tutorial showing how you made this box. GlendaJ
ReplyDelete