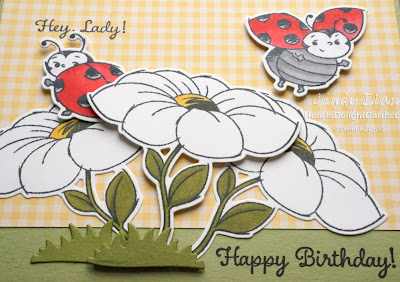
One of the birthdays in "the month of many birthdays" is my kid sister's. Well, she's not a kid anymore, lol, but she will always be my baby sister. She's a redhead, and when she was little her nickname was Ladybug.
So you can imagine how tickled I was to see the new Little Ladybug Sale-A-Bration host freebie! It is so stinkin' adorable, and I've seen lots of samples using it on Pinterest. The only problem was, I didn't want to fussy cut all those images. Thankfully, Stampin' Up! will be releasing a set of dies for it, starting February 4th. It will be part of the Coordination Product Release that includes dies for other popular stamp sets, too, as well as a DSP pack that coordinates with some punches!
I love how SU makes it so easy to be creative, and appreciate them saving my fingers from tedious fussy cutting. Not that I dislike fussy cutting when necessary, but it's nice to not have to.
To qualify for Little Ladybug, your order must be $300 or more, so get some friends and family and have a catalog party to help you qualify! Not only would you get the Little Ladybug, but you'd also earn up to six items in the SAB flyer PLUS you'd have $30 in Stampin' Rewards to redeem!
Okay, I'll quit yakking and get to the tutorial. *grin*
Cardstock Cuts
Card base: Pear Pizzazz 5-1/2" x 8-1/2" scored and folded at 4-1/4"
Background: So Saffron gingham (from Subtles DSP pack) 3-1/2" x 5-3/8"
Images: Whisper White 4-1/4" x 5-1/2"
Grass: Old Olive scraps
Instructions
- Adhere gingham background to card base, leaving an even border at top and sides.
- Stamp greetings with StazOn ink
- Stamp images using Memento ink, as shown above.
- Color leaves/stems, flower centers, and the ladybugs with Stampin' Blends, then cut with coordinating dies.
- Cut two grass clumps from Old Olive cardstock.
- Arrange flowers on card base (trim stems, as needed), having left and right blossoms adhered directly to card base, and center blossom popped up on dimensionals.
- Adhere one grass clump directly to card base and second clump popped up on dimensionals.
- Adhere left ladybug by putting a dimensional under her head and gluing her bum down with liquid glue (tuck her bum under the center blossom). Adhere right ladybug with dimensionals.
Product List


This is such a sweet card to work with and you did a super job. So cute!
ReplyDeleteThanks, Marlene! I had fun making it....hope my sister likes it. :)
DeleteVery cute, Im sure your sister with love it. I am enjoying my
ReplyDeleteladybug stamps also.