Showing posts with label SA. Show all posts

Friday, August 17, 2012

Stampin' Addicts Holiday Catalog Hop


Hooray! You've arrived at stop #10 on the Stampin' Addicts Holiday Catalog Blog Hop. You may have gotten here by clicking the "Next" button on Katherine's My Magical Inkery Tour blog, or you may have just stumbled upon the hop here. Either way, you can find the complete list here of the 14 stops, each featuring a fabulous product from the new SU Holiday Catalog. Today I'm showing the adorable Monster Munchies stamp set, which can be used to make Halloween cards, party invitations, and decorate treats, too!


First, let's start with a card. Notice there are two stamps combined to get the image? The spider web in the "Boo" was begging to have the spider nearby, so I inked just the spider with a Stampin' Write Marker. The clear mount stamp made it easy to position perfectly under the B.

Very Vanilla, Basic Black, Howlstooth & Scaringbone DSP (MDS2), 1/2" Striped Satin Ribbon,
Big Shot, Labels Collection Framelits, Perfect Polka-Dots Folder, Googlies

Next is a fun invitation to the Halloween party I have planned. The "Come as you aren't" part of the greeting just gives me the giggles. And how about Franken-kilroy peering over the top? Isn't he cute with those googly eyes?

Lucky Limeade, Very Vanilla, Howlstooth & Scaringbone DSP (MDS2), Heat Tool, Black EP, 
Decorative Label Punch, Boho Blossoms Punch, Big Shot, Houndstooth Folder, Paper Piercing Tool, Googlies

Now a party must have refreshments for the party-goers, so up next we have a bottle of delicious Spider Cider (recognize the spider?) and a treat box with a bag of party mix. 'Ol Frankie makes another appearance as well, to tie in with the invitation.

Tangerine Tango, Lucky Limeade, Very Vanilla, Howlstooth & Scaringbone DSP (MDS2), Extra-Large Oval Punch, 1-1/4" Square Punch, Scallop Square Punch, Big Shot, Finishing Touches Edgelits, Lucky Limeade Bakers Twine, Black Brads, Crystal Effects, 1/2" Striped Satin Ribbon

Now, if you have seen the Howlstooth & Scaringbone Designer Series Paper, you may have noticed that there aren't any Lucky Limeade stripes or chevrons. Wanna know how I did it? It was EASY!!! Come back Monday and I'll tell you how!
Animation from millan.net

Thanks so much for stopping by! Next on the tour is Betty at Kitty Stamp. She chose to feature the Frightening Feline stamp. Go figure.... (tee hee!)


This blog hop was put on by the Stampin' Addicts, a friendly group of stamping enthusiasts, both SU demonstrators and general public. Our motto is "Positively Creative! Positively Stampin' Up!" This THE online community to visit if you love Stampin' Up!

Friday, December 30, 2011

Stampin' Addicts 2012 Occasions Mini Blog Hop

Hello, and welcome to the latest Stampin' Addicts blog hop! We are featuring items from the new Occasions Mini catalog that starts January 4th, and boy oh boy are there some fabulous new goodies to showcase! If you started at the beginning, you just hopped here from Rhonda's blog, where she showed the Bordering on Romance stamp set. That hinged card was cute, wasn't it? I am stop # 5 on the hop. You can find a complete hop list here, in case you need it.

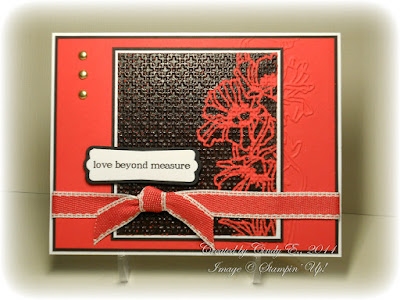
I chose the Mixed Bunch stamp set, which has a lovely Blossom Punch to match! The first card has a 3-D blossom made by stamping and punching the flower image three times, then moistening them with water and "scrunching". I think red, black, and white look so sophisticated together, don't you?
Stamps: Mixed Bunch, Thank You Kindly
Cardstock: Whisper White, Poppy Parade
Ink: Basic Black Classic
Accessories: Blossom Punch, Big Shot, Vintage Wallpaper folder, Cherry Cobbler Dazzling Details, Basic Black 5/8" Satin Ribbon

The next card is kind of a cute, funky little thing, using one of the smaller stamps in the set. These flowers were punched using the Blossom Bouquet Triple Layer Punch.
Stamps: Mixed Bunch, Bring On The Cake
Cardstock: Basic Black, Whisper White, Calypso Coral, Wisteria Wonder, and Lucky Limeade, Berry Blossoms DSP, Calypso Coral, Wisteria Wonder, and Lucky Limeade In Color DSP
Ink: Basic Black, Poppy Parade, Concord Crush, and Old Olive Classic
Accessories: Calypso Coral, Wisteria Wonder, and Lucky Limeade Baker's Twine, In Color Designer Printed Brads, Blossom Bouquet Triple Layer Punch, lollipop sticks (non-SU)

And the last project is a gift set of 3x3 cards (and envelopes) in a Scallop Envelope box. The butterfly was made by trimming down the punched flower and adding pearls for the body. Cute, huh? Glad you think so, because that gift set is blog candy! Just leave a comment and you're entered to win (US addresses only, please). Winner will be announced Monday.
Stamps: Mixed Bunch, Petite Pairs
Cardstock: Baja Breeze, Island Indigo, Riding Hood Red, Whisper White, Twitterpated DSP
Ink: Island Indigo
Accessories: Big Shot, Scallop Envelope Die, 1" Square Punch, Postage Stamp Punch, Pool Party Baker's Twine, Pearls Basic Jewels, Island Indigo 3/8" Ruffled Ribbon, Calypso Coral 1/8" Organdy Ribbon, Modern Label Punch, Decorative Label Punch, 3/4" Circle Punch, 1" Circle Punch, 1-1/4" Circle Punch, Blossom Punch

Thanks so much for stopping by! I hope you were inspired. :) Your next stop is Heidi's tea-riffic blog. (Teehee!)


When you have a chance, be sure to check out Stampin' Addicts, where the motto is "Positively creative! Positively Stampin' Up!"  Positive attitudes AND creativity abound there, and all Stampin' Up! fans are welcome, whether you're a stampin' newbie or a seasoned demo.

Wednesday, December 21, 2011

SA Swaps

In addition to an open forum for anyone who loves Stampin' Up!, Stampin' Addicts has a section that is just for demonstrators. (You can't get in unless someone tells you the super-secret handshake.) 
And one of the thing we demos like to do is swap card fronts with other demos, when we get to pre-order from the upcoming catalogs.  Being a swap junkie, naturally I signed up for a couple swaps that were due the week before Christmas.  The. Week. Before. Christmas.  What was I thinking?!
Thankfully, I only signed up for two swaps this time (I've been known to commit to 6-8 swaps, plus blog hops), so I managed to get them done without too much stress. This card is for the 2012 Occasions Mini Swap.


Stamps: Mixed Bunch (available 1/4), Word Play
Cardstock: Island Indigo, Twitterpated DSP (available 1/4)
Ink: Island Indigo Classic (I know - I need to re-ink my pad)
Accessories: Blossom Punch (available 1/4), Big Shot, Elegant Bouquet embossing folder, Old Olive 1/8" Taffeta Ribbon, Lucky Limeade 3/8" Ruffled Ribbon, Tempting Turquoise button (Brights Collection)

Next year, would somebody please come kick my behind if I sign up for swaps during the holidays?

Friday, October 14, 2011

BIG SHOT BLOG HOP!

Greetings, and welcome to the Stampin' Addicts Big Shot Blog Hop! We are featuring some of the wonderful things you can do with this AWESOME tool. After you see the fabulousness, you're gonna want one of your very own, and you can get one for FREE - just ask any of the bloggers on this hop how!!!

I am stop #16 (of 18) and if you are following the hop in order, you just landed here from Tanya's page, where she is featuring the Buttons #5 Die. (Click HERE for the complete list.)

My Big Shot accessory is the Holiday Stocking Die. I love everything about Christmas, and just had to have this die as soon as I saw it! And my first project is a Christmas card (what else?)!
As you can see, the die cuts the stocking, cuff, toe and heel pieces which makes it fun to mix and match. (See those tiny gold bells? I magically turned the silver Mini Jingle Bells into gold. Come back Monday to learn how!)

The next project can be either a gift for someone naughty or nice, or an ornament to decorate a door or tree.
It's fun to use non-traditional colors sometimes, and using Pool Party for Christmas just made me giggle. One doesn't usually associate swimming pools with Christmas.....well, unless you live in the Southern Hemisphere!

My last project shows that this stocking die can be used for more than just the holidays. Here is an adorable baby bootie card that could be used as an announcement, baby shower invite, or a congratulations card.
I've even seen this die turned upside down and made into a stick horse! I had lots more ideas, but ran out of time, so be sure to check back periodically. I may just wow you with this Holiday Stocking Die in the near future!

Thanks for stopping by! Up next is Adriana's blog. She's featuring the Stocking Accents Die, the companion for this one!


This blog hop was organized by the good folks at Stampin Addicts, a friendly forum for folks fond of Stampin' Up! Come join in the mayhem...I mean, fun and creativity!  It's open to demonstrators and and regular stampers - anyone that loves Stampin' Up! Pssst! Be sure to check out the gallery when you're there!

Sunday, September 18, 2011

Another Swap

One of the many swaps I signed up for was for 3x3 cards. They are so quick and easy to make, don't use much material, and are perfect tucked in a gift bag, taped on a wrapped gift, or secreted into a loved one's lunch box or purse. You can get eight of them from one 12 x 12 sheet of cardstock!

Stamps: Gently Falling, Tiny Tags
Cardstock: Very Vanilla, Old Olive, Soft Suede
Ink: VersaMark, Old Olive Classic, Soft Suede Classic, Soft Suede Stampin' Write Marker
Accessories: Gold Stampin' Emboss Powder, Heat Tool, Linen Thread, Jewelry Tag Punch, 1/16" Handheld Punch, Old Olive 1/8" Grosgrain Ribbon, Stampin' Dimensionals
Stamps: Gently Falling, Fabulous Phrases
Cardstock: Very Vanilla, Soft Suede, Peach Parfait Textured, White Vellum Cardstock, Spice Cake Designer Series Paper

Ink: VersaMark, Peach Parfait and Soft Suede Classic, Cajun Craze Stampin' Write Marker

Accessories: Black Stampin' Emboss Powder, Heat Tool, Big Shot Die-Cut Machine, Finial Press Embossing Folder, In Color Glimmer Brads, Stampin' Dimensionals

Friday, August 26, 2011

Stampin' Addicts 2011 Holiday Mini Hop


Welcome to the Stampin' Addicts Holiday Mini Blog Hop! This weekend we have 19 stampers who have created fabulous projects using products from the upcoming Stampin' Up! 2011 Holiday Mini Catalog. Can't make it through all 19 blogs in one sitting? No worries! We'll be here all weekend long. If you've been following the links in order, you just arrived from Holly's blog, showcasing the Always Thankful stamp set. Wasn't that wine holder cool?! Click the banner above for a list of all the blogs.

I am featuring the Pines & Poinsettias stamp set, but I have a couple of other goodies to share, too!  With Christmas sneaking up on us quicker than you think, now is a good time to get started on those holiday cards and gifts.  So up first is a card, of course!
As always, you can click on the pics twice for extra close-up views of my mistakes. :-)
See that beautiful velvet ribbon? That's the Very Vanilla ribbon in the Holiday Mini, colored (on the back, non-fuzzy side) with a Stampin' Write Marker! You can make it any color you want! A Glimmer Brad makes the perfect cinch for the bow.
The second card is a variation of one made for a Stampin' Addicts swap. (I love swapping with other SA members, because they make the BEST cards!) The background patterned paper was made by repeatedly stamping the scroll image in Crumb Cake, then lightly coloring with a blender pen. And the lovely embossed background behind it is the new Snow Burst embossing folder!

Notice the glittery snowflake? In the Holiday Mini there is some beautiful Silver Glimmer Paper, but the silver just didn't look right on the Very Vanilla/Crumb Cake/Cherry Cobbler background. So, I colored it, too! This can be done carefully with the side of a marker, or with an Aqua Painter and Classic ink refills.

Now Christmas wouldn't be complete without a little gift, so I made a trinket box, decorated it, and added a tag that uses the "Christmas" banner in the stamp set.
The 3"x3"x2" box was a piece of cake to make with the new Simply Scored Tool, which is also in the new catalog. Wait until you see how useful it is....it is AWESOME!!!

And last, there's a little something to put in the trinket box. The holly leaves are also in the Pines & Poinsettias set and were the perfect size for the Simply Adorned Charm insert.  I'm new to making charm inserts, and the tiny "canvas" was a fun challenge! You can get an idea of the scale by the little image with the quarter down in the corner.
Well, that's all for my projects this time! Be sure to stop by Stampin' Addicts and see what they're about! Their motto is "Positively Creative! Positively Stampin' Up!"  Membership is free and you'll have access to a gallery FULL of great ideas like the ones you've been seeing on the hop, along with a friendly group of creative people!

Next blog on the hop is Shelley's blog, where she is featuring The Sounding Joy stamp set.


 Hey, you're still here? Why aren't you hopping? Oh, I get it.....maybe you were thinking there might, perhaps, just maybe be some blog candy down here.  Heh-heh, you clever thing, you!  Well, there is a little something.  Just leave a comment about which project you liked the best, and if you are chosen, you'll win that little decorated trinket box, the charm insert (but not the charm itself!), and instructions on how to make the box using the Simply Scored Tool. (U.S. residents only, please!)

Come back Tuesday, when I'll announce the winner and list the materials used in the projects above.

Friday, July 29, 2011

Welcome to the New Catalog Mega Hop!

Greetings - I'm so glad you could join us today! This is Day 1 of the Stampin' Addicts New Catalog Blog Hop. It will last all weekend, and each stop along the way will feature an item from the newly released Stampin' Up! Idea Book & Catalog. For the complete list of blogs, click HERE. If you've been following the links in order, you just arrived from Jennifer's blog, Stampin' on the Fly. Weren't those balloons just adorable?! At the bottom of this post are the buttons leading you on to the next stop.

I am featuring the stamp set called Pennant Parade, and the matching Petite Pennants Builder Punch. You might think you'd be limited as to what you could do with this set, but you'd be wrong! We were allowed to do up to four projects for the hop, to keep things moving smoothly, but I could have done twice that easily!

First up is a card to welcome a sweet baby girl. This card is an A6 size (4½" x 6¼") to accommodate the 5th pennant. The background is lightly embossed, and there are multiple layers of ribbon. See that pink scallop ribbon? That's the new ½" Scallop Dots Ribbon, folded in half with the dots inside!
(As always, you can click on the images to see more detail, along with all the mistakes, lol.)
Stamps: Pennant Parade, Short & Sweet
Cardstock: Whisper White, Pretty in Pink, Just Add Cake and Pretty in Pink Designer Series Paper
Classic Ink: Pretty in Pink, Pink Pirouette, Early Espresso
Accessories: Big Shot, Perfect Details Texturz Plate, Pitite Pennants Builder Punch, ½" Circle Punch, Itty Bitty Shapes Circle Punch, White Baker's Twine, Silver Mini Brads, Pretty in Pink 5/8" Satin Ribbon, Whisper White 5/8" Organza Ribbon, Pretty in Pink ½" Scallop Dots Ribbon, Stampin' Dimensionals

Up next is a fun card for the golf enthusiast....and there are several in my family! It's hard to tell from the photo, but the hole is really a hole punched in the "green". The sky was sponged on over the masked clouds. Looks like this golfer better finish the next nine holes before the rain comes!
Stamps: Pennant Parade, On Your Birthday
Cardstock: Shimmery White, Whisper White, Marina Mist, Garden Green, Wild Wasabi, Island Indigo, Basic Black, Early Espresso, Just Add Cake Designer Series Paper
Classic Ink: So Saffron, Bashful Blue, Garden Green, Soft Suede, Island Indigo
Accessories: Big Shot, Perfect Polka_dots Embossing Folder, Large Oval Punch, 1¼" Circle Punch, Petite Pennants Builder Punch, Stampin' Sponge, bamboo skewer, Stampin' Dimensionals

Next on the agenda is a card perfect for a friend or family member that loves to quilt. The stamped pennants were punched out and fastened to a cardstock base with the Big Shot Multipurpose Adhesive Sheets (that stuff is so cool)!  Then they were embossed to give the look of a washed quilt. Little knots of Baker's Twine were added for the tied-quilt look. So, how did I choose the coordinating colors?  I used the Color Coach and looked up Pool Party.
Stamps: Pennant Parade, On Your Birthday
Cardstock: Pool Party, So Saffron, Wild Wasabi, Whisper White
Ink: Pool Party, So Saffron, and Wild Wasabi Classic, Basic Black Craft
Accessories: Big Shot, Big Shot Multipurpose Adhesive Sheets, Square Lattice Embossing Folder, Pool Party 3/8" Ruffled Ribbon, White Baker's Twine, Black Stampin' Emboss Powder, Heat Tool, ¼" Circle Punch, Stampin' Dimensionals

And finally, even though it's the middle of a sweltering summer, I just had to make a contemporary style Christmas card. This card looks soooo much better in real life! The Mocha Morning Designer Series Paper was my inspiration for the non-traditional colors. And guess what I discovered? You can (carefully) heat emboss the Satin Ribbon! The starburst stamp was inked with VersaMark and stamped down the ribbon (use the Embossing Buddy first!), then the gold embossing powder was added.
Stamps: Pennant Parade, Heard From the Heart
Cardstock: Basic Black, Brushed Gold, Mocha Morning Specialty Designer Series Paper
Ink: Basic Black Craft, VersaMark
Accessories: Iridescent Ice, Black, and Gold Stampin' Emboss Powder, Heat Tool, Basic Black 5/8" Satin Ribbon, Stampin' Dimensionals

Well, I hope you enjoyed your visit here, and leave with lots of inspiration! Your next stop is Sarah Wills' blog, Sarah's Ink Spot. She's featuring Jack of All Trades!


When you've completed all the stops on the hop, I hope you'll hop over to Stampin' Addicts and join in the fun there. It's free, it's fun, and it's open to all Stampin' Up! enthusiasts, whether they be seasoned demonstrators, or newbies just starting stamping. The folks there are the nicest people, ready to help answer any questions. Be sure to check out the gallery for inspiration!

Friday, April 29, 2011

Welcome to the Stampin' Addicts Summer Mini Extravaganza!

Hellooo, so kind of you to stop by! As you may have heard, it's a very special day today....William and Kate are getting married! What? That's not why you're here?! Oh, then you must be looking for the Stampin' Addicts Summer Mini Blog Hop. Well then, you've come to the right place! If you've been following the links from the beginning, you've just landed here from Betty's blog, where she featured the fabulous new colors of Embossing Powders.  (If you get lost along the way, just click the banner above to find the complete hop list and links!)

Today I am showcasing the Flower Garden Embossing Folder. I think embossing, whether dry or heat, is my favorite technique, so I'm always excited to see what Stampin' Up! comes up with in their new catalogs....and this one certainly didn't disappoint! (Not that they ever do!)

First up is a card near and dear to this California girl's heart....California Poppies!  
(As always, you can click on the images to see more detail, along with all the mistakes, lol.)
This look was achieved by coloring on the embossing folder with Stampin' Write Markers. It's a fun technique with a high "WOW" factor! Quick tip: If you get ink where you don't want it, wipe it up with a Blender Pen.

Next is a card that combines both dry embossing and heat embossing. It has sort of an Asian feel, don't you think?
VersaMark ink was brayered on the embossing folder before running the cardstock through the Big Shot. It was heat embossed with black embossing powder, and then put through the Big Shot again with the Square Lattice embossing folder. Pretty cool effect, 'eh?

The last card is much softer looking. The flowers were embossed along the short side of the cardstock, and after rubbing Stampin' Pastels on the stems and petals, the focal image was cut and matted on the Rich Razzleberry background.
If you look closely, you'll see the flower centers were accented with Champagne Mist Shimmer Paint (love that stuff). I'm not usually a fan of "fussy cutting", but this card just called for something to make it "pop".
For my last project, cardstock-weight White Vellum was embossed, then used as a window panel for the combination gift bag/luminaria. Fill a cellophane bag with scented bath salts, tie a pretty bow and place in the bag. Slip in a LED tea light and you have a mini spa in a bag. Great gift for Mother's Day!!!

Your next stop is Twila's blog featuring the Touch of Kindness stamp set. I adore that little bird bath!!!

After you have visited all the stops on the hop, I hope you will hop over and visit Stampin' Addicts! This is the greatest group of friendly, creative, helpful people (all addicted to Stampin' Up!) that you would ever want to meet. Everyone is welcome, from beginning stamper to seasoned demonstrator, so stop by and say 'Hi', and tell them Cindy sent you!

Tuesday, April 26, 2011

Swappin', Swappin', Swappin'...

....and getting ready for blog hoppin', though my eyes ares poppin'...... from too many late nights. (Sorry, can't make it rhyme, but Billy Crystal singing a modified version of Rawhide in 'City Slickers' comes to mind!)
This is one of the cards make for a 2011 Summer Mini catalog swap over at Stampin' Addicts. It uses the soon-to-be-released Fabulous Florets stamp set, which is - well, FABULOUS!

I love, love, love being a part of Stampin' Addicts swaps, because I know I will always get the highest quality swaps in return!  Of course, when I see the fabulousness of the cards I get back, I have feelings of total failure and inadequacy over what I sent, because everyone else is just so darned good at what they do!

Stamp: Fabulous Florets (available May 1st, Summer Mini)
Cardstock: Early Espresso, Confetti Cream, Crumb Cake, Watercolor Paper
Ink: Whisper White Craft, Pretty in Pink Classic, Rose Red , Old Olive Classic, Early Espresso Classic
Accessories: White Stampin' Emboss Powder, Heat Tool, Aqua Painter, Early Espresso 1/4" Grosgrain Ribbon, Naturals brads, Modern Label Punch, Vintage Wallpaper embossing folder, Big Shot Die-Cut Machine, Stampin' Dimensionals

This Friday starts another S.A. weekend blog hop, woohoo! We'll be showing you sneak peeks of what's coming in the new Summer Mini catalog. I'll be featuring the new Flower Garden embossing folder. Ya know I love flowers and gardening, so it's a match made in heaven!!!

Friday, February 25, 2011

Just What Is So Special About February 22?

George Washington, the father of our country, was born on this day. So was my little sister, who always got her birthday off from school (the little twerp). Oh yeah, and so was a fabulous new stamping forum called Stampin' Addicts! And to celebrate their 2nd birthday, we are having a Birthday Blog Hop featuring different stamping techniques, all with a birthday theme. If you are following the hop in order, you just landed here from Holly's blog, where punch art was the technique. That pizza made me hungry! This is stop number three and the technique is Watercoloring. (Here's a link to all the stops on the hop, in case you get lost.)

The first card uses the marker-to-stamp technique. Using a Stampin' Write Marker, color directly on your stamp. Mist Shimmery White cardstock lightly with water before stamping to get that soft watercolor look.
Click Images to See Larger
Up next is the Watercolor Bleed technique using re-inkers. Heat emboss image in white on Shimmer White cardstock or Watercolor Paper. Moisten image with water in a mist sprayer, then pick up ink with an Aqua Painter and spread it around, letting it "bleed" on the image.
And the last card features a quick, easy technique. Simply stamp the image on Watercolor Paper using a Classic Stampin' Pad in your color choice, then use a Blender pen to spread the color around as desired. Easy-peasy! Note: After the pony was inked up, the Blender Pen was used to remove the ink on the eye and nostril. Then a Soft Suede Stampin' Write Marker was used to color (marker-to-stamp) the eye and nose.
There are sooo many different ways to watercolor...you've only seen a few here! I hope you are inspired to try some of these techniques. Check back on Monday for the materials used in each card.

Up next is Carmen's blog, where she's going to show the inlaid embossing technique (one of my new favorites!). Love the bats, especially.......

Thanks so much for stopping by today!
Be sure to check out Stampin' Addicts. It is a warm, friendly Stampin' Up-only community, and is open to everyone, not just demonstrators! It's free, it's fun, and it's full of fabulous ideas. (Be sure to check out the gallery.)  Tell 'em Cindy sent you!