Sunday, September 30, 2018

The Stamp Review Crew - Buffalo Check

https://stampreviewcrew.blogspot.com/2018/10/buffalo-check.html

Today the Stamp Review Crew has a little something different for you - we are focusing on a background stamp called Buffalo Check! This leaves the possibilities wide open for us to use other stamps as the focal point, so it should be fun to see what the Crew has dreamed up for this hop! The Stamp Review Crew is a group of Stampin' Up! demos from around the world who like to show you all the different ways a particular stamp set can be used. Whether you landed here from Dawn's blog, or are starting here, just follow the links on each blog to take the whole tour!


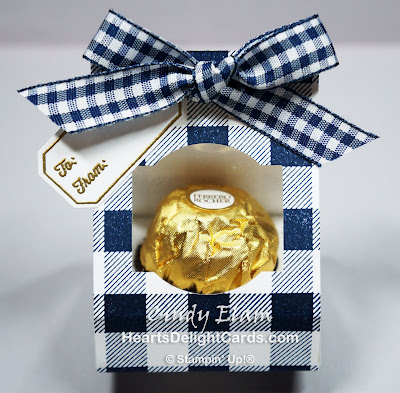
The is the Buffalo Check background stamp. Pretty basic, but can be used for so many looks! I had several ideas, but finally decided on a farmhouse feel. These checks remind me of the old TV show Home Improvement. Tim (The Toolman) Taylor's sidekick Al always wore checkered shirts. That was such a funny show!

Heart's Delight Cards, Buffalo Check, Farmhouse Christmas, Treat Holder, Stampin' Up!

Anyhoooo, yesterday I held a Christmas Treats Packaging class, and one of the treats we made was an adorable Ferrero Rocher holder. I designed it five years ago, but decided to update it using current products. So for this one, I created the "DSP" using the background stamp, and then used some more on the card! This would be a nice little treat for your honey when he checks something off the "honey do" list.

Heart's Delight Cards, Buffalo Check, Farmhouse Christmas, Treat Holder, Stampin' Up!

The Tin Tile background was sponged with Vegas Gold Shimmer Paint to complement the gold foil and greeting on the treat, then lightly sanded for a distressed look.

Heart's Delight Cards, Buffalo Check, Farmhouse Christmas, Treat Holder, Stampin' Up!

Tutorial for the treat holder can be found HERE. It really is just the cutest little thing in real life! It would be a great stocking stuffer, or even a little something for a co-worker or teacher.

Heart's Delight Cards, Buffalo Check, Farmhouse Christmas, Treat Holder, Stampin' Up!

That's all for me. Thanks for stopping by! Up next is Holly, and she is the QUEEN of lovely layers....I just love her style!

 http://tiddbitsfromdawn.typepad.com/tiddbits-from-dawn/2018/09/the-stamp-review-crew-buffalo-check-edition.html
 http://rubberredneck.typepad.com/rubber-redneck/2018/09/stamp-review-crew-hop-buffalo-check.html


Product List

Friday, September 28, 2018

My Inky Friends Challenge #10 - Color!

https://myinkyfriends.blogspot.com/2018/09/my-inky-friends-design-challenge-10.html

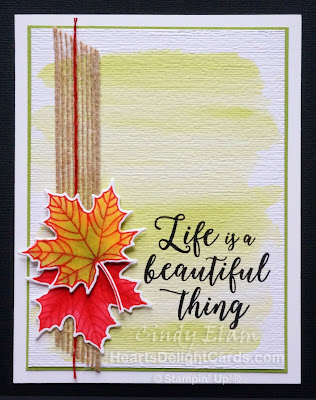
This month's challenge from My Inky Friends is a fun color challenge, and with the changes in the air around here, I immediately thought of Autumn! Naturally, Colorful Seasons came to mind so I got out the Daffodil, Poppy, and Granny Apple Stampin' Blends, as well as the Poppy Parade and Granny Apple Green ink pads and went to work.

Heart's Delight Cards, MIFDC10, Colorful Seasons, Stampin' Up!

The background is a Granny Apple Green watercolor wash. When it was dry, the greeting was stamped with StazOn and then it was embossed with the Subtle folder. After adhering a Granny Apple Green mat, it was attached to the card base.

Heart's Delight Cards, MIFDC10, Colorful Seasons, Stampin' Up!

The leaves were stamped with Poppy Parade ink, then colored with the three Blends' colors and die cut with the coordinating die. I colored a piece of Linen Thread with the Light Poppy Parade Stampin' Blends marker to layer on top of the Burlap Ribbon for a little added interest.

Heart's Delight Cards, MIFDC10, Colorful Seasons, Stampin' Up!

If you'd like to play along with the challenge, click the banner at the top of the page or follow the link below. the guidelines are simple!
1. For a sketch challenge, follow the general design of the sketch, although it can be flipped. For a color challenge, Stampin' Up! colors are listed. You can use compatible colors and add neutrals as needed.
2. Create something new that has not been posted before.
3. Post your creation on your blog or online gallery, and please provide a link back to our challenge. Provide a direct link to your project or post to the Linky on the challenge page
4. Feel free to combine up to three challenges, as long as you include a link to the Inky Friends post.
5. Most important of all - have fun!

The leaves are starting to change here, but it's been cool and gray and rainy for four days so it's hard to see the hills. How's the weather where you are?

Product List

Saturday, September 22, 2018

Detailed Poinsettia Meets Winter Woods

Heart's Delight Cards, Peaceful Poinsettia, Winter Woods, Christmas Card, Stampin' Up!

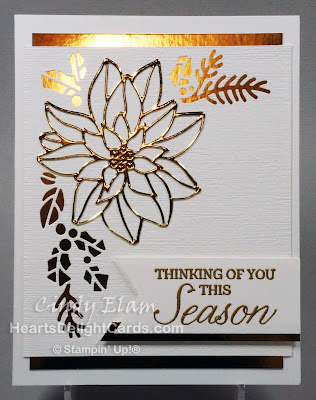
I just love the combination of white with gold, don't you? It looks so elegant, and I thought this would be a perfect combo to use with the Detailed Poinsettia Thinlits Dies. I borrowed the greeting from Winter Woods because I thought the combination of fonts looked good with this design.

Heart's Delight Cards, Peaceful Poinsettia, Winter Woods, Christmas Card, Stampin' Up!

After cutting the 4" x 4-5/8" Whisper White panel with the pine/holly die, it was embossed with the Subtle Dynamic folder. The gold poinsettia was cut from the 3-3/4" x 5" foil background, taking care to place it where the cuts wouldn't show through the pine/holly cuts in the white panel.

Heart's Delight Cards, Peaceful Poinsettia, Winter Woods, Christmas Card, Stampin' Up!

The poinsettia was glued to the embossed die cut panel. I left the center stamen pieces in the die cut. The foil piece was adhered to the back and the whole thing then adhered to the card base.

After the greeting was heat embossed in gold, the banner end was cut with the Banner Triple Punch. There was a strip of gold foil laying on the desk and out of curiosity I held it behind the greeting banner. It looked good, so it got added as an afterthought! Then the greeting was popped up on dimensionals on the card.

Heart's Delight Cards, Detailed Poinsettia Thinlits Dies, Stampin' Up!

The Detailed Poinsettia dies are so easy to use, and you can cut the inner detail and the outline at the same time! I thought it would be fun to go for the glitz on the next card, so I cut the poinsettia out of Merry Merlot glimmer paper (in the Joyous Noel Glimmer pack) and used Tranquil Tide glimmer as the back drop for the pine and holly cut outs.

Heart's Delight Cards, Peaceful Poinsettia, Winter Woods, Christmas Card, Stampin' Up!

This time I did use a greeting from the Peaceful Poinsettia stamp set that coordinates with the dies. Some gold metallic pearls were added to the center because, well.... more is more, right?

Heart's Delight Cards, Peaceful Poinsettia, Winter Woods, Christmas Card, Stampin' Up!

So there you have two cards; one kind of classy and one kind of glitzy. Which one do you like best?

Product List