Showing posts with label Deer. Show all posts

Saturday, October 29, 2022

CCM Saturday Blog Hop - Animals

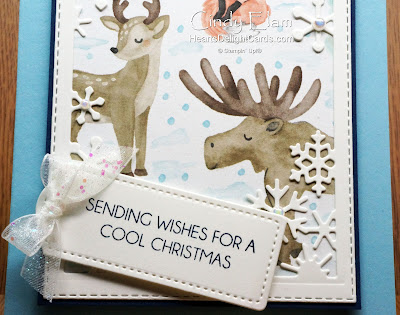
Today's Create With Connie & Mary Saturday Blog Hop theme is Animals - any from the Jul-Dec Mini Catalog. There were several possibilities and I almost went with North Pole Mischief (love that cat), but then I remembered the adorable animals in the Storybook Gnomes DSP and I just had to use them. I mean, how can you not love the reindeer, moose, fox, rabbit, and birds? It's got it ALL! Unfortunately the birds got covered by the greeting tag and you can only see the rabbit's legs but, trust me, they are cute!


I was tempted to fussy cut them all and build a scene with them, but the layout on the patterned paper was perfect just as it was, so I framed it with the snowflake frame from the Snowman Magic bundle (which also has animals, by the way).


After adding a Night of Navy mat and embellishing with iridescent pearls and bow, the card was complete.


That's all for today - see you next Saturday! Up next is Libby Fens at Libby Stamps. Or click the "back" button to go back to Lori at Loritamarie Crafts.


Stampin' Up! products used:

  • Stamps: Snowman Magic Bundle
  • Paper: Basic White, Night of Navy, and Balmy Blue cardstock, Storybook Gnomes DSP
  • Ink: Night of Navy
  • Accessories: Stitched Rectangles Dies, Tailor Made Tags Dies, Iridescent Pearls Basic Jewels, Glittered Organdy Ribbon 


Friday, December 1, 2017

Twelve Days of Christmas TAGS, Day 3


Are these not the cutest little Christmas tags?! These were some of the things I colored when I was stamping with friends a couple weeks ago. The Seasonal Chums and matching Seasonal Tags Framelits made it super easy to make these tags!

I started with a Whisper White base and added a layer of the polka dots from the Fabulous Foil Designer Acetate. Then both were cut with the (retired) Ornate Tag Topper Punch. Just to dress it up a bit, some leftover gold foil tape from a Paper Pumpkin kit was added to the bottom edge.


After stamping the "To: From:" inside, the little deer were adhered on the tops with Mini Glue Dots, and 1/8" Sheer White Ribbon was added to tie them onto their gifts.

Product List

Friday, September 1, 2017

The Holiday Catalog is LIVE!


I'm so excited because starting today you can see the holiday catalog in its entirety! The new stamps, DSP, tools, and embellishments are fabulous!!! If you don't have a paper copy from me and would like one, just let me know. Meanwhile, you can see it by clicking the image on the left side of this page!


Today's card uses another image from the Seasonal Chums set. Isn't this little deer just a little dear?! Just too cute! That's a gold Foil Snowflake behind him. The snowflakes come 24 in a pack - 12 each of gold and silver. You can find them on page 47!


After stamping the little guy on Shimmery White and coloring him, I added some Fine-Tip Glue to the bell to give it some shine.

So here it is, September 1st already, and I still haven't started my Christmas cards in earnest. I think I'll make some more of these and put them in the card box to send in December!

By the way, there is an awesome Host Promotion going on in September and October. Details coming tomorrow but you can see a preview now!


Here's the "How To"
 Deer: Shimmery White 2" x 2-3/4"
 Circle: Whisper White  2-1/2" x 2-1/2"
 DSP: Quilted Christmas DSP 1-1/2" x 5-1/2"
 Foil strip: Gold Foil 1/2" x 5-1/2"
 Card base: Whisper White Thick 5-1/2" x 8-1/2" scored & folded at 4-1/4"
  1. Adhere foil snowflake to card base. Adhere foil strip to back of DSP with 1/8" showing, and then adhere to card base.
  2. Die cut circle with the 2-1/8" die in Layering Circles Framelits. Stamp greeting and adhere over snowflake.
  3. Stamp and color deer, then die cut with coordinating the framelit in Seasonal Tags Framelits. Trim around the antlers and adhere to card with dimensionals.
Product List (Note: Seasonal Chums is available in both wood- and clear-mount options)

Tuesday, March 22, 2016

Birthday in the Meadow


Here's a quick and easy card for those always-difficult masculine birthdays. It uses the In the Meadow stamp set, and the greeting is from Party Pants, a free SAB set. (Sale-A-Bration ends in just over a week, so don't miss out on your favorite items. They will be gone forever....Stampin' Up! doesn't bring them back.)

And here's a BONUS for you - the Curvy Trio Corner Punch is 25% off as one of the weekly deals this week! It's like getting three punches for the price of one, woohoo!

The "How To" for this card
Small image panel: Very Vanilla 2-14" x 2-1/2"
Mat behind small image panel: Early Espresso 2-1/2" x 2-3/4"
Large image panel: Very Vanilla 3-3/4" x 5"
Card base: Early Espresso 5-1/2" x 8-1/2", scored and folded at 4-1/4"

  1. Stamp mountains in Early Espresso to the right of the large image panel, about halfway between top and bottom, letting some of the mountain hang off the right edge of the cardstock.
  2. Stamp trees on the left side, about halfway between top and bottom, letting some of the trees hang off the left edge of the cardstock. Punch upper right with Curvy Trio punch.
  3. Adhere large image panel to card base.
  4. Stamp deer in Early Espresso ink on small image panel and color with a Blender Pen and Soft Suede ink. Mat on small Early Espresso mat with adhesive.
  5. Adhere small image panel and mat to left side of large image panel on card base using Stampin' Dimensionals. Add Candy Dots.
  6. Stamp birthday greeting to the right of small image panel.
STAMPS: In the Meadow, Party Pants
CARDSTOCK: Very Vanilla, Early Espresso
INK: Early Espresso, Soft Suede
ACCESSORIES: Curvy Trio Corner Punch, Blender Pens, Neutrals Candy Dots, Stampin' Dimensionals

Tuesday, January 26, 2016

Doe, a Deer


We have a lot of deer around here and really enjoy watching them, as do our neighbors, Erika and Iven. His birthday is coming up in a couple weeks, so I thought a deer-themed card would be very appropriate. Iven is the one who told us about putting a salt lick out for the deer, which we did. They discovered it a couple days ago. They are such beautiful, graceful creatures!


STAMPS: In the Meadow, Sky Is the Limit (SAB)
CARDSTOCK: Whisper White, Kraft
INK: Basic Black Archival, Pool Party, Copic Markers BG11, E13, E15, E39, E50, G24
ACCESSORIES: Big Shot, Woodland embossing folder (coming back in the annual catalog in June!), Sharpie Extra Fine White Poster Paint Marker, Pool Party seam binding ribbon (ret.), Stampin' Dimensionals

Thursday, June 21, 2012

Father's Day Christmas?!


Did that title get your attention, lol?  The Christmas part came from using the Christmas Deer stamp. I'm getting smarter in my old age (haha), and have started looking at stamps with an eye toward "Can I use this in more than one way?"  Upon first glance, the Christmas Deer stamp would be "No", but then I thought if I just inked up the deer and left off the ornate antlers, I could use it for a masculine card, too!  Turned out pretty well, I think.


Doing marker-to-stamp works better on smaller areas, but I think the slight lines from the marker makes it look like the deer is standing in a slanting snowfall.  Anyway, I'm sure dad liked it. :-)

Stamps: Christmas Deer, Lovely as a Tree, Teeny Tiny Wishes
Cardstock: Very Vanilla, Early Espresso, Basic Black, Well Worn DSP (retired)
Ink: Early Espresso Stampin' Pad and Stampin' Write Marker
Accessories: Big Shot, Chevron Folder, Bitty Banners Framelits, Essentials Paper-Piercing Pack, Paper Piercing Tool, Stampin Sponges