Showing posts with label Snowman Magic. Show all posts

Saturday, October 29, 2022

CCM Saturday Blog Hop - Animals

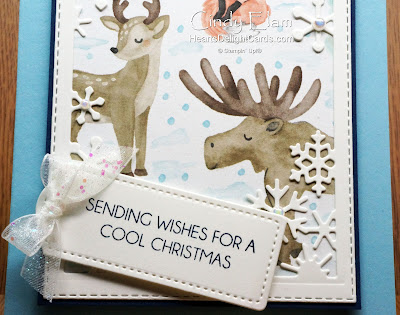
Today's Create With Connie & Mary Saturday Blog Hop theme is Animals - any from the Jul-Dec Mini Catalog. There were several possibilities and I almost went with North Pole Mischief (love that cat), but then I remembered the adorable animals in the Storybook Gnomes DSP and I just had to use them. I mean, how can you not love the reindeer, moose, fox, rabbit, and birds? It's got it ALL! Unfortunately the birds got covered by the greeting tag and you can only see the rabbit's legs but, trust me, they are cute!


I was tempted to fussy cut them all and build a scene with them, but the layout on the patterned paper was perfect just as it was, so I framed it with the snowflake frame from the Snowman Magic bundle (which also has animals, by the way).


After adding a Night of Navy mat and embellishing with iridescent pearls and bow, the card was complete.


That's all for today - see you next Saturday! Up next is Libby Fens at Libby Stamps. Or click the "back" button to go back to Lori at Loritamarie Crafts.


Stampin' Up! products used:

  • Stamps: Snowman Magic Bundle
  • Paper: Basic White, Night of Navy, and Balmy Blue cardstock, Storybook Gnomes DSP
  • Ink: Night of Navy
  • Accessories: Stitched Rectangles Dies, Tailor Made Tags Dies, Iridescent Pearls Basic Jewels, Glittered Organdy Ribbon 


Saturday, July 16, 2022

CCM Saturday Blog Hop - Christmas in July!

Today's Create With Connie & Mary Saturday Blog Hop theme is Christmas in July! Great theme, huh? 😁 Today I'm featuring the Snowman Magic Bundle because, well, snowmen....and snowflakes!


I masked off the card base to created the snowy hills and sky, then used a Blending Brush and Tahitian Tide to create the sky.


After stamping the Soft Succulent trees, I die cut the snowflake frame and glued it on the card front. The snow man, arms, hat and scarf were all die cut, glued, and attached with dimensionals. I thought the pearl heart was the perfect touch!


That's all for today - see you next Saturday! Up next is Libby Fens at Libby Stamps. Or click the "back" button to go back to Lori at Loritamarie Crafts.


Stampin' Up! products used:

  • Stamps: Snowman Magic Bundle
  • Paper: Basic White, Crumb Cake
  • Ink: Tahitian Tide, Basic Gray, Fresh Freesia, Soft Succulent, Light Pumpkin Pie Stampin' Blend
  • Accessories: Heart Pearls


Monday, July 4, 2022

12 Day of Christmas in July!


Are you thinking about Christmas yet? I know today is Independence Day, but it also marks the beginning of my 12 Days of Christmas in July!!! Every Monday, Wednesday, and Friday in July I will post a Christmas-themed project with instructions and a supply list to make it easy for you to duplicate. I'm going to assume you have a die cut & emboss machine and various adhesives, so I'm not going to list them. *smile*

The Jul-Dec mini catalog just started, along with our second Sale-a-Bration of the year and SAB runs through the end of August, so you have time to get your holiday card supplies AND earn freebies, too!

Without further ado, here is our first project, a card using the Snowman Magic bundle found on page 44 of the J-D catalog. (Reside in the USA and don't have a catalog? Contact me and I'll send you one!) Note: If you order the Snowman Magic bundle and a pack of the Glimmer Specialty Paper, you'd qualify for one of the "Free w/ $50 purchase" items in the SAB brochure.

Measurements

  • Card base: Basic White 5-1/2" x 8-1/2", scored & folded at 4-1/4"
  • Inner embossed panel: Basic White 4" x 5-1/4"
  • Die cut trees: Glimmer Specialty Paper (Evening Evergreen 2" x 3" and Gold 1" x 3")

Instructions

  1. Using the snowflake frame die, cut the front of the card base so the frame border is even at top and sides. The bottom border should be slightly larger to accommodate the greeting. Stamp greeting in Evening Evergreen ink. (I forgot to take a photo of that step.)

  2. Emboss the inner panel using the hills in the Charming Landscapes embossing folders.

  3. Die cut two Evening Evergreen trees and one Gold tree from the glimmer paper and adhere to embossed panel with liquid glue.

  4. Adhere panel to inside of snowflake frame with liquid glue and add white adhesive-backed sequins.
Product List