Showing posts with label Happy Mail. Show all posts

Monday, April 13, 2020

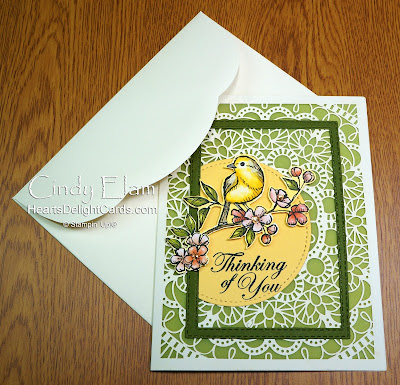
Free as a Bird Happy Mail

Heart's Delight Cards, Bird Ballad, Free As A Bird, Happy Mail, Thinking of You, Stampin' Up!

I find it ironic that my current favorite stamp set is called Free as a Bird, since we most definitely aren't at this particular time. Counted among my many blessings is the love of card making, and my rather large hoard collection of stamping-related supplies. I can shelter in place for as long as it takes to get past these trying times, with enough product to keep me busy for a loooong time. Now, if my garden would just start producing, I wouldn't even have to go grocery shopping.
Smiley from Millan.Net

Heart's Delight Cards, Bird Ballad, Free As A Bird, Happy Mail, Thinking of You, Stampin' Up!

Since I'm spending so much time taking my mind off of world affairs, I've been making and sending many more cards than usual. Happy mail is just the ticket for brightening someone's spirits. "Use up the pre-made card and envelope sets" is on my to-do list, and the Bird Ballad Laser Cut cards were at the top of that list. They are positively lovely, and paired with fussy cut images from the Bird Ballad DSP, make a beautiful card.

The greeting is from Good Morning Magnolia and I also used a sentiment from it on the inside that seemed so appropriate: The journey of life is best shared with a friend. We'll get through this together.

Heart's Delight Cards, Bird Ballad, Free As A Bird, Happy Mail, Thinking of You, Stampin' Up!

I want to encourage you to make the time to do something creative every day, if possible. It will take your mind off things that are beyond our control (other than self-isolating) and, if you make a card, SEND that card! It will brighten someone's day. Try not to dwell on the bad news. There is so much good happening, too, so focus on that. AND DON'T FORGET TO SEND THAT CARD! Someone needs to hear from you.

Smiley from Millan.Net

Product List

Monday, July 29, 2019

Happy Mail!

Heart's Delight Cards, Join My Team, Happy Mail, Stampin' Up!

Last week I sent out the "Welcome Kit" happy mail to my new stamping family members. I'm so happy that they took advantage of the Extra, Extra deal going on right now! It definitely is a bargain - way more bang for your crafting $$.

This was the cute Happy Mail envelope tucked inside the Priority Mail envelope. I wanted it to get there as quickly as possible!

Heart's Delight Cards, Crafting Forever, Join My Team, Happy Mail, Stampin' Up!

And this was the card that was included. I hope our new "family" members are feeling the love!

Heart's Delight Cards, Crafting Forever, Join My Team, Happy Mail, Stampin' Up!

If you would like a Welcome Kit from me, just join my little stamping family and I'll get one to you! You get to choose the items* in your Starter Kit, and there is absolutely no obligation to do anything further. It's all your choice if you want to just grab the bargain, and drop after your first full quarter. Or, if you like getting the 20% demo discount, order enough to stay active, or even turn it into a little business. Whatever you choose, I'll be happy to have you on the team!


* If you join in August, you can choose preorder items from the upcoming Holiday catalog! Believe me, there are some "must haves" there!!!

 Smiley from Millan.Net

Sunday, October 30, 2016

Warm Winter Wishes


My BFF sent me a stamp set that she had a duplicate of - gee, I can't imagine how that could happen! I mean, really, who could possibly forget that they had ordered something, and order it again? Oh yeah, that would be me. More times than I care to admit. So anyhoo, I was the lucky beneficiary of her forgetfulness and received this cute stamp set out of the blue one day. Can we say Happy Mail?!

Since we just had out first frost last weekend, and I actually got to wear a sweater, I figured it was appropriate to bring out the comforting images of mittens, knit cap, and cable knit. The images are from Simon Says Stamp Winter Warmth; the cable knit is Stampin' Up!


Here's the "How To"
 Images: Very Vanilla 2" x 6"
 Mat: Cherry Cobbler 2" x 8"
 Greeting: Very Vanilla 1-1/2" x 4-1/8"
 Embossed background: Very Vanilla 4-1/4" x 5-1/2"
 Card base; Very Vanilla 5-1/2" x 8-1/2" scored and folded at 4-1/4"
  1. Stamp mittens and cap (evenly spaced) on larger Very Vanilla strip using Basic Black ink. Color with Cherry Cobbler marker and punch out each image with 1-1/2" circle punch. Stamp hearts on mittens with Cherry Cobbler ink.
  2. Die cut four 1-5/8" circles from Cherry Cobbler strip. Adhere images to circles. Adhere snowflake to remaining circle. Note: I used a retired Snowflake Element; you can use a die cut or whatever works in that space.
  3. Stamp greeting and scarf on smaller Very Vanilla strip using Cherry Cobbler ink. Color scarf with marker. Note: I used an Avery Elle die for the pierced border. You can use a paper piercing tool if you don't have a die. Adhere Cherry Cobbler ribbon under upper edge of greeting panel, leaving ends to wrap around embossed panel.
  4. Emboss Very Vanilla with Cable Knit folder, then trim down to 4-1/8" x 5-3/8". Adhere greeting to bottom, wrap ends of ribbon to back and adhere.
  5. Attach images with dimensionals, and snowflake with liquid glue (it already sticks up, so don't use dimensionals!).
  Product List

Tuesday, July 19, 2016

Fun & Fancy Free(ks)!


It's that time again; time for the monthly Control Freaks Tour de Freaks! This month's theme is Fun & Fancy Free, which means anything goes! Should be an interesting tour this month (not that they aren't always, but you know what I mean).

If you started at the beginning, you just landed here from Wickedly Wonderful Creations. Wendy always has something special to share! I'm number two on the tour, and there are fourteen of us this month, so be sure you click the "next" button at the bottom of each page so you don't miss anything!

Hoo boy, my mind went in about a million different directions since we didn't have a theme, but I finally settled on using the gorgeous Serene Scenery DSP stack, and seeing where it would take me. First up is a cute little Bluebird sitting on a twine "wire." We have tons of birds flitting in the trees and shrubs here, so the leaves on this sheet inspired me. I used the Fine-Tip Glue Pen to add some shine to the bird's eyes. (Those leaves look a lot like my poor sapling cherry tree's leaves since the darn Japanese beetles have been at them. Grrr!)

STAMPS: Best Birds  CARDSTOCK: Whisper White, Old Olive, Sahara Sand, Serene Scenery DSP  INK: Basic Black Archival, Pacific Point, Flirty Flamingo  ACCESSORIES: Big Shot, Birds & Blooms Framelits, Black Baker's Twine, Fine-Tip Glue Pen

Next I wanted to use the sheet that had the rustic painted paneling, and immediately thought "country chic" which led me to the cowboy boots in Country Livin'. This card is going to a friend tomorrow, as part of the #imbringingbackhappymail challenge!

STAMPS: Country Livin', Love & Affection  CARDSTOCK: Whisper White, Kraft, Soft Suede, Serene Scenery DSP  INK: Basic Black Archival, Soft Suede, Smoky Slate, So Saffron  ACCESSORIES: Big Shot, Layering Circles Framelits, Blender Pen, 5/8" Burlap Ribbon, 3/8" Very Vanilla Stitched Satin Ribbon

Lastly, I went in a whole 'nother direction with the paper stack. As soon as I saw the dotted Crumb Cake (on the back of what I call the Amber Waves of Grain, lol), I knew it had to be snow! And yes, it is July and hotter'n Hades, but I'm dreaming about cooler seasons just ahead! This card uses the AWESOME limited-release Thoughtful Branches bundle that will be available to customers from August 2nd-31st. The tree was die-cut in Soft Suede and Whisper White. The WW was glued to the back a little offset, so it looks like snow on the branches. Cool, huh? (See what I did there? Heh heh)

STAMPS: Thoughtful Branches, Snow Place  CARDSTOCK: Whisper White, Soft Suede, Serene Scenery DSP  INK: Real Red, VersaMark  ACCESSORIES: Big Shot, Seaside T.I.E.F., Heat Tool, Black Stampin' Emboss Powder, Clear Wink of Stella Glitter Brush, Metallics Sequin Assortment, Fine-Tip Glue Pen

A bit of clear Wink of Stella was added to the ridges of the Seaside T.I.E.F.-embossed cardstock. It looks like snowdrifts, to me!

That's all I have to share this month, so hop on over to Debbie Henderson's blog, Debbie's Designs for more Fun & Fancy inspiration!

http://debbiesdesignsblog.blogspot.com/2016/07/controlfreaksjul2016.html

Monday, July 18, 2016

I'm Bringing Back Happy Mail


Another batch of happy mail cards were sent out today! It does my heart good to know that in a few days, some special people will be opening their mail boxes and finding something fun, instead of bills and junk mail. And it also makes my heart happy that I am using some Designer Series Paper and embellishments that I have been hoarding collecting for a few years. I can't think of a better use for it!

This is a one-off card, but most of the others were variations of this in different colors and with different stamps. I hope it brings a smile to the recipient!

Here's the "How To" Image panel: Shimmery White 2-3/4" x 4" Mat: Dapper Denim 2-7/8" x 4-1/8"
Embossed panel: Whisper White 4" x 5-1/4"
DSP: Marina Mist (Subtles DSP Stack) 1-1/2" x 4" Card base: Whisper White 5-1/2" x 8-1/2", scored at 4-1/4" and folded
  1. Emboss Whisper White panel with Petal Burst embossing folder and adhere to card base.
  2. Add DSP to bottom of embossed panel, and a strip of Washi Tape to cover seam. (I used the retired Metallics Glitter Tape.)
  3. Stamp flower outline in Dapper Denim, filler in Marina Mist, and stem in Garden Green on shimmery white. Paint leaves with Aqua Painter or Blender Pen. 
  4. Stamp greeting from Flourishing Phrases.
  5. Adhere image to mat, and mat to card base.
  6. Tie a bow with silver twine (also retired) and adhere with Glue Dot.
NOTE: I used the Cross-Stitched Rectangles die from Lawn Fawn on the image panel.

Product List