Showing posts with label Tour de Freaks. Show all posts

Monday, October 19, 2020

GRATITUDE, from the Control Freaks

This month the Tour de Freaks are focusing on gratitude! Despite this crazy year, there is still much to be thankful for, and I count my blessings every single day. I'm first on the blog roll this month, but you may have landed here from Connie's blog, Stamp and Art Squared. Either way, welcome! There are seven of us this time, so be sure to follow the links at the bottom of each stop to visit all the Freaks.

I chose the oldie but goodie Country Home set, because I really liked the greeting. I am thankful for ALL the good things. (And sometimes even for the bad, because it makes me appreciate the good all the more.) Instead of using the milk can or pitcher image to place the bouquet in, I opted to use the bouquet as a background for the sentiment.

Some Cinnamon Cider was sponged around the edge of the image panel to give it a bit of an aged look after coloring and embossing.

On this next card, I did use the pitcher for the cotton boll bouquet. At first I was going to just use the DSP (In Good Taste) as the background, but then I had the idea to pop the frame up for dimension, and make it look like a still life painting. 

I think it turned out kind of neat! It needed a smaller sentiment, so I used Itty Bitty Greetings for the expression of gratitude.

That's all I have to share today. I wanted to do more, but Mom is here for a two week visit, so I haven't had a lot of time to create.

Up next is Tami at Swimming in Stamps, so hop on over to see her project!


Thursday, December 19, 2019

Freaks With Techniques!


This month's edition of the Tour de Freaks is a lot of fun because we are featuring techniques (new or old), along with some sneak peeks from the upcoming Jan-June Mini Catalog and Sale-A-Bration! If you landed here from Tami's blog, Swimming In Stamps, welcome! Just follow the links on each blog to go to the next stop on the tour.

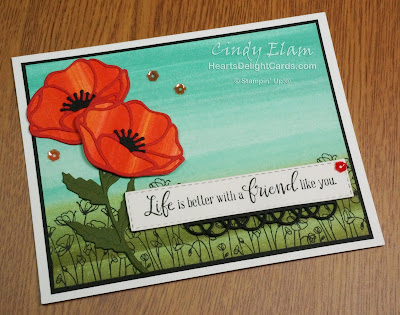
I dusted off an old technique that I haven't done in eons, called the Baby Wipe Technique. If you aren't familiar with it, you take a fresh baby wipe and fold it up, then place drops of Classic Stampin' Ink Refills of your color choice on the wipe. You can use it as a temporary stamp pad (it gives a lovely mottled look, depending on drop placement), or you can use it to wipe across cardstock to create a background like I did here. I think it works best on Shimmery White cardstock, because you have a little time to blend it.

Painted Poppies, Baby-wipe technique, Stampin' Up!, Heart's Delight Cards

Pool Party, Coastal Cabana, Pear Pizzaz, and Old Olive were used for this background, and the soon to be released Peaceful Poppies Suite is the sneak peek! There are TWO stamp/die bundles in the suite that are made to coordinate with each other, and they are AWESOME!

Painted Poppies, Baby-wipe technique, Stampin' Up!, Heart's Delight Cards

The poppies were also "baby wiped" using Poppy Parade (of course) as well as Mango Melody before being cut with the Poppy Moments Dies. And did you notice the teeny flower sequins? Those are part of the suite, too, and come in colors to coordinate with the DSP.

Painted Poppies, Baby-wipe technique, Stampin' Up!, Heart's Delight Cards

When I was finished with this card, I hated to throw away the wipe, because I knew I could get a bit more use from it. So I wiped another background and thought about which new sneak peek to choose. I hadn't played with Forever Blossoms yet, so I grabbed it and started working. There is even another technique on this card called Marker to Stamp. This can only be done with the water-based ink in Stampin' Write Markers, NOT the Stampin' Blends! After using the Old Olive & Flirty Flamingo markers to color directly on the stamp, I huffed on it to re-moisten the ink, and then stamped on Whisper White cardstock.

Forever Blossoms, Baby-wipe technique, Stampin' Up!, Heart's Delight Cards

Now this is where the Stampin' Blends come into play! Since the image was stamped with water-based ink, I could use the alcohol-based Stampin' Blends to fill it in. I had the Heirloom Frames piece in my box of useful bits, so after die cutting the bloom I laid it out to see how it looked.

Forever Blossoms, Baby-wipe technique, Stampin' Up!, Heart's Delight Cards

Ugh... the background looked too strong to me, so I toned it down with a bit of Vellum Cardstock, embossed with the Parisian Flourish 3D embossing folder that is part of the Parisian Blossoms Suite (another AWESOME product suite coming soon to a craft room near you)! While I had it out, I did the envelope flap, too.

Forever Blossoms, Baby-wipe technique, Stampin' Up!, Heart's Delight Cards

That leeettle stitched label is part of yet another stamp/die bundle called So Sentimental, which just happens to be part of my next card!

So Sentimental, Happy Birthday To You, Baby-wipe technique, Stampin' Up!, Heart's Delight Cards

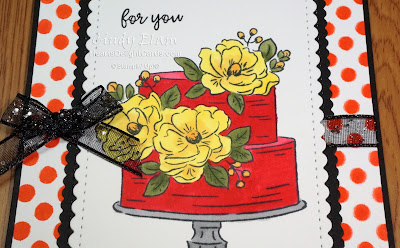
SQUEEEE, stitched scallop rectangles.... be still my heart! The greeting is part of that bundle, too, but the cake image is in the new Sale-A-Bration set called Happy Birthday To You. This was a last-minute thrown together card. I had almost tossed the Poppy Parade/Mango Melody wipe in the waste bin when I thought, "Hey, I can make a background with this one, too!" So I grabbed the Basic Pattern Decorative Masks, and went to town with the polka dot one. (I don't know why, but it makes me think of Minnie Mouse, LOL.)

So Sentimental, Happy Birthday To You, Baby-wipe technique, Stampin' Up!, Heart's Delight Cards

A quick stamp of the cake with Memento ink, some coloring with Stampin' Blends, a few passes through the die cut machine with the stitched scallops and it was ready to assemble! You just never know where or when inspiration will strike. *smile*

Up next is Bree, aka Craft-somnia Momma. I can't wait to see what she used for her technique!


https://craft-somniamomma.blogspot.com/2019/12/controlfreaksdecember2019.html

Tuesday, November 19, 2019

Winter Wonderland, Control Freaks Style!


Welcome once again to the monthly Tour de Freaks! This month our theme is Winter Wonderland, so anything chilly, frosty, or frozen goes! I'm the first stop on the tour, but you may have landed here from The Stamp Doc. Weren't Melissa's projects awesome? There are seven of us on this month's hop, so click the button at the bottom of each stop to hop on to the next stop!

Like I said, the theme is Winter, which can be anything winter-related, whether a holiday, or just plain old frosty beauty. And the perfect frosty beauty comes in the Feels Like Frost Specialty Designer Paper. I've used it on both my cards today. Up first is a card using the Frosted Foliage stamp set that is part of the Feels Like Frost Suite. It is a set of six cling stamps with five Frosted Frames Dies that coordinate. (Look on page 41 of the Holiday catalog.)

Heart's Delight Cards, Frosted Foliage, Stampin' Up! 2019 Holiday Catalog

The frame was cut from Vellum Cardstock, with icy accents added using Shimmery Crystal Effects and Ice Stampin' Glitter.

Heart's Delight Cards, Frosted Foliage, Stampin' Up! 2019 Holiday Catalog

Some snowflakes were also added, cut from Sparkle Glimmer Paper to jazz it up a bit more. In keeping with the cool theme, the greeting was stamped in Night of Navy and cut with the label die.

Heart's Delight Cards, Frosted Foliage, Stampin' Up! 2019 Holiday Catalog

It really is so much more sparkly in real life! The next card combines the beautiful Snow Globe Scenes Dies (page 43) with a greeting from Itty Bitty Christmas. And that fabulous DSP, of course!

Heart's Delight Cards, Still Scenes, Stampin' Up! 2019 Holiday Catalog

The trio of trees was cut twice and overlapped to make the snowy woods behind the church. I also added some Ice Stampin' Glitter to the trees for more frosty sparkle, and Sparkle Glimmer snowy hills.

Heart's Delight Cards, Still Scenes, Stampin' Up! 2019 Holiday Catalog

The greeting was stamped on a strip of Vellum Cardstock using StazOn Jet Black, and adhered at the side with a glue dot.

Heart's Delight Cards, Still Scenes, Stampin' Up! 2019 Holiday Catalog

Round iridescent sequins from Snowflake Sequins added a touch more shimmery goodness, and also covered the glue dot under the greeting. That Shimmery Crystal Effects is fab for gluing sequins!

Up next is our newest Freak, Bree Renwick, over at Craft-somnia Momma. Be sure to give her a warm welcome!

https://craft-somniamomma.blogspot.com/2019/11/controlfreaksnovember2019.html


Monday, August 19, 2019

The Freaks Are Getting Fancy (Folds, That Is!)


This month's edition of the Tour de Freaks is sure to be fun because we are featuring fancy folds, gift tags, or gift packaging, along with some sneak peeks from the upcoming Holiday Catalog! If you landed here from Melissa's blog, The Stamp Doc, welcome! Just follow the links on each blog to go to the next stop on the tour.

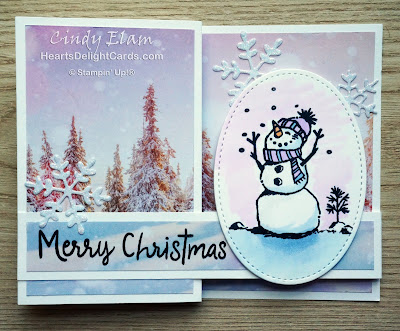
I knew immediately what I wanted to do when this theme came up. It's been so bloomin' HOT here that I can't wait for cooler weather and, dare I say it....SNOW?! We got slighted in the snow department last year, and I'm hoping this year will be different. So, with that in mind, pairing the new Snowman Season stamp set with the gorgeous Feels Like Frost Specialty DSP was a no-brainer!

Heart's Delight Cards, Snowman Season, Feels Like Frost, Tour de Freaks, Stampin' Up! Holiday 2019

If you have never made a Double Z-Fold card, you really must try it. It's so quick and easy and packs a little wow, too! Start with a 4-1/4" x 11" piece of cardstock for the card base and score it at 2-3/4" and 5-1/2", then fold in a z-fold. Then do the same to another piece (1" x 11" used here). Flip it around, add your DSP or stamping and adhere it to the card base. So simple!

Heart's Delight Cards, Snowman Season, Feels Like Frost, Tour de Freaks, Stampin' Up! Holiday 2019

The snowman scene was colored with Seaside Spray and Purple Posy Combo Stampin' Blend Markers to coordinate with the Feels Like Frost DSP. Some Sparkle Glimmer Paper snowflakes were cut with the Frosted Frames Dies, which are part of the Feels Like Frost Suite.

Heart's Delight Cards, Snowman Season, Feels Like Frost, Tour de Freaks, Stampin' Up! Holiday 2019

Now hop on over to Julie's blog, Julie's Stamping Spot to see what confection she has cooked up!

https://juliedavison.blogspot.com/2019/08/controlfreaksaugust2019.html

Friday, July 19, 2019

Simple to Stepped Up Tour de Freaks

Heart's Delight Cards, Band Together, Tour de Freaks, Stampin' Up!, 2019-2020 Annual Catalog

Welcome to this month's Tour de Freaks blog hop! Our theme this month is "Simple to Stepped Up" which is right up my alley. It's fun to make quick and easy, simple cards, and then take the same card to the next level by stepping it up a bit. My three cards today are simple, stepped up, and almost over the top, LOL. If you arrived here from Julie's blog, Julie's Stamping Spot, howdy! Just follow the links to take the whole tour.


Since I hadn't yet played with the Band Together bundle, I thought that would be a good one to use. I really am trying to be better about using ALL the stamps I buy - it's just that there are so many pretty stamps and so little time!

For the simple card shown at the top, I stamped with Memento ink on Shimmery White cardstock, colored it with Stampin' Blends, adhered it to a Whisper White card base, and that was it - easy peasy, and a good example of a CAS card!

The stepped up card started out the same, but I added an Old Olive foil belly band (Noble Peacock Foil Sheets) and popped the greeting up on dimensionals to make it a bit more interesting.

Heart's Delight Cards, Band Together, Tour de Freaks, Stampin' Up!, 2019-2020 Annual Catalog

The third card is what I'd consider extra stepped up, but not really "over the top". Over the top to me means lots of layers, textures, ribbon and/or embellishments.

Heart's Delight Cards, Band Together, Tour de Freaks, Stampin' Up!, 2019-2020 Annual Catalog

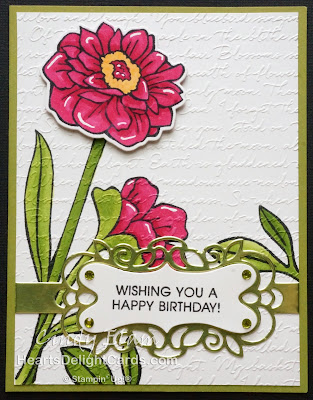
This one has the same basic layout as the others, but this time I used the Scripty 3D embossing folder (love that thing!) on the image panel, stamped and colored an extra blossom to die cut and pop up on dimensionals, added white highlights to the petals, Old Olive rhinestones to the greeting, and adhered it to an Old Olive card base. THIS one is a little more my style (must be the bling, LOL)!

Heart's Delight Cards, Band Together, Tour de Freaks, Stampin' Up!, 2019-2020 Annual Catalog

Up next is Debbie Henderson at Debbie's Designs - I'm sure she is going to wow you!

https://debbiesdesignsblog.blogspot.com/2019/07/controlfreaksjuly2019.html


Friday, April 19, 2019

Control Freaks, for All the Men!


It's the men's turn! Fathers, sons, brothers, grandfathers, nephews, uncles, and brothers-in-law are getting some special attention this month. I am always in need of masculine cards, and am so frequently at a loss for ideas. It's hard for me when all I want to do is break out the flower stamps, and add ribbons and bows and doilies, LOL.

But I have a special treat for you! I have the Sailing Home bundle from the new annual catalog that starts June 4th, so you get a sneaky peek! And I know Wendy has it too, so the next stop on the tour will have more ideas for this fabulous set!

If you landed here from Debbie Henderson's blog, Debbie's Designs, weren't her projects awesome? I'm sure by now you know how to hop, so just follow all the links to take the short five-stop tour.

So, when I said I got the Sailing Home bundle, that wasn't entirely true.... I got the entire SUITE! Everything except the High Seas 3D embossing folder, which wasn't on the preorder list, darn it! Anyhoooo, since my daddy was career Navy, and my hubby is also a Navy veteran, I knew I just had to get it. Here is my first card, a birthday card manly enough for any man.

Heart's Delight Cards, 2019 AC Sneak Peek, Sailing Home, Stampin' Up!

The blue seas were embossed with the Seaside folder (retiring!) on a 1-1/2" x 3-3/4" piece of Seaside Spray (New In Color!) cardstock. It was adhered to a 3-3/4" x 5" piece of Whisper White, and then on a 3-7/8" x 5-1/8" Night of Navy mat.

Heart's Delight Cards, 2019 AC Sneak Peek, Sailing Home, Stampin' Up!

I tied the new Night of Navy/Sahara Sand baker's twine in a square knot and adhered the ends on back, then popped the panel up on dimensionals on the Sahara Sand card base. The sail boats were stamped in Night of Navy, and a Blender Pen was used to spread the color around. I think it's awesome that the boats, ship's wheel (cut AND emboss!), and banner are all dies included in the Smooth Sailing Dies!

My next card is a perfect thank you for any guy that has helped you in some way. No frilly flowers or bows on this card. Nuh uh. It uses what I think is my favorite (for now, anyway) set in the new catalog - Free As A Bird. It can be bought as a bundle with the Stitched Nested Labels Dies, which are uh-MAZE-ing! The bird was stamped in Soft Suede and the leafy branch in Mossy Meadow. After coloring the bird (Crumb Cake Dark & Light, Soft Suede Dark, Calypso Coral Light) and leaves (Mossy Meadow Light) the image was cut with one of the dies. A second piece was cut using the next smaller die from Wood Textures DSP, split and adhered to the back.

Heart's Delight Cards, 2019 AC Sneak Peek, Free As A Bird, Stampin' Up!

Notice that beautiful Mossy Meadow Linen Thread? That's part of the Magnolia Lane Suite - another superb suite! I am happy to see that the Woodland embossing folder is carrying over. Here's a close up of the Stitched Nested Label, which is really more like tiny dots, and I LOVE them!

Heart's Delight Cards, 2019 AC Sneak Peek, Free As A Bird, Stampin' Up!

Oh there is so much to love in the new catalog, starting with a whole new layout! I can't wait until everyone has their own catalog to pore over. Be sure you have lots of Post-It flags....you're gonna need them!

Up next is the wonderful Wendy Weixler, with her Wickedly Wonderful Creations!


https://wickedlywonderfulcreations.blogspot.com/2019/04/controlfreaksapril2019.html

Friday, October 19, 2018

Happy Fall from the Control Freaks!


Yep, FALL is the theme this month and we are starting to see some Fall colors here in East Tennessee. It is so beautiful; definitely my favorite time of year! If you started at the beginning, you just arrived from Kelly Acheson's blog, A Stamp Above. But if you started with me, no worries! Just click the "Next" button at the bottom of the page to go on to the next stop.

When I think of Fall, I think of chilly breezes swirling colorful leaves (hooray for sweater weather!), stacking firewood to prepare for cold winter nights, hot cocoa, spiced cider, harvests & pumpkins. It's right up there with raindrops on roses and whiskers on kittens as a few of my favorite things, so I decided to make a couple of cards featuring some of these things!

Heart's Delight Cards, Colorful Seasons, Fall, Autumn, Stampin' Up!

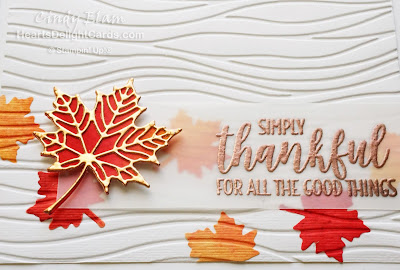
First up is the card with the colorful swirling leaves. I did a watercolor wash with Brusho Crystal Colors then cut the large and small leaves from Seasonal Layers. The small leaves were glued to the background and "pressed" with the Subtle folder to embed them into the cardstock. Then it was embossed again with the Seaside folder to give the impression of wind-blown leaves.

Heart's Delight Cards, Colorful Seasons, Fall, Autumn, Stampin' Up!

After all the work, it occurred to me I could have gotten the same look by using the Baby Wipe Technique with the small leaf stamp in Colorful Seasons, which is what I did on the envelope flap. Sheesh. The light's on folks, but nobody's home.

Smiley from Millan.Net

Heart's Delight Cards, Colorful Seasons, Fall, Autumn, Stampin' Up!

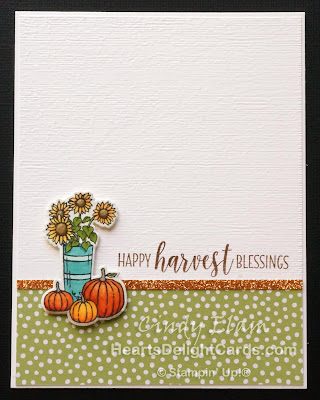
For the next card, I went with a CAS look. I just adore the sunflowers and pumpkins in the At Home With You stamp set and, of course, it involves coloring! And, like Colorful Seasons, it has coordinating dies so I didn't have to fussy cut anything.

Heart's Delight Cards, At Home With You, Fall, Autumn, Stampin' Up!

I started by figuring where the greeting (Country Home) needed to be stamped on the background, then embossed it with the Subtle folder. A 1-1/2" strip of Pear Pizzazz DSP was added to the bottom, with a narrow strip of Copper Glimmer Paper (Joyous Noel Glimmer pack). After coloring and die cutting the image, it was popped up on dimensionals.

Heart's Delight Cards, At Home With You, Fall, Autumn, Stampin' Up!

Instead of stamping the envelope flap, a 2-1/4" x 6" piece of DSP was glued to the flap and the excess trimmed off. I love how coordinated it all looks!

Heart's Delight Cards, At Home With You, Fall, Autumn, Stampin' Up!

That's all for my "Ode to Autumn." Thank you for stopping by! Up next is Julie Davison over at Julie's Stamping Spot. I'm sure she will have you falling for Fall, too!

https://juliedavison.blogspot.com/2018/10/controlfreaksoctober2018.html