Showing posts with label Timeless Textures. Show all posts

Sunday, May 19, 2019

Control Freaks Say Goodbye to Old Friends


So long, farewell, auf Wiedersehen, goodbye - The Control Freaks Tour de Freaks theme this month is "Goodbye to Old Friends" which could be retiring items from the catalog, or a friend's retirement, or even someone who is moving away; it will be fun to see what each Freak decided to do! If you hopped here from Debbie's page, Debbie's Designs, welcome! If you are starting here (howdy!), follow the link at the bottom for the next stop on the tour and to see the other six blogs.

Today I am showing three retiring stamps sets, two retiring In Colors, two retiring embossing folders, one retiring die set and a partridge in a pear tree! Not really on the partridge, but I couldn't resist....

Smiley from Millan.Net

My first card features two stamp sets, the lovely Southern Serenade (using two of the stamps), and the oh-so-useful Timeless Textures (three stamps). The grid from Timeless Textures was heat embossed in gold, then the scrolly fleur de lis and spatters were stamped in Powder Pink.

Heart's Delight Cards, Southern Serenade, Timeless Textures, Stampin' Up!

After stamping the floral stem in Memento ink and coloring the flowers with Powder Pink and a Blender Pen, the leaves were colored using light and dark Mossy Meadow Blends. The image was then die cut with the new Stitched Nested labels and the edges colored with the edge of a Powder Pink Stampin' Write marker.

Heart's Delight Cards, Southern Serenade, Timeless Textures, Stampin' Up!

A greeting from Southern Serenade and a scattering of white Basic Adhesive-Backed Sequins completed the card.

Heart's Delight Cards, Southern Serenade, Timeless Textures, Stampin' Up!

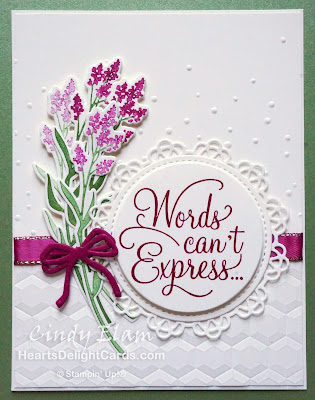
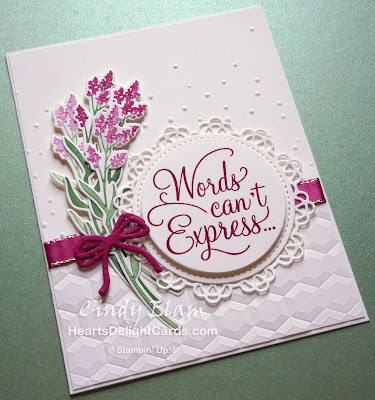
The second card features the Dear Doily stamp and die bundle that I am soooo bummed is retiring. Words can't express how sad I was when I saw it didn't make the cut for the new catalog. Ahhhhh, well, I'll survive....I think.

Heart's Delight Cards, Dear Doily, Stampin' Up!

The flowers on the sprig were colored and stamped two times with Berry Burst and Garden Green Stampin' Write Markers, then stamped two more times, not re-inking the stamp. It gives a lovely softer look, don't you agree? After die cutting them with the Doily Builder Thinlits, they were arranged and glued in place. Two bows were cut from Berry Burst cardstock and after removing the ends of one, it was glued behind the other for a double loop bow.

Heart's Delight Cards, Dear Doily, Stampin' Up!

The background was embossed with both the Hexagons and Softly Falling folders and a strip of Berry Burst Silver Edged Ribbon covered the seam where they come together. I love all the different textures and layers on this card!

Heart's Delight Cards, Dear Doily, Stampin' Up!

Thanks for stopping by today! Up next is Melissa, over at Rubber Funatics.

https://rubberfunatics.blogspot.com/2019/05/controlfreaksmay2019.html

Sunday, June 4, 2017

Heartland Makes my Heart Happy!


This is one of those stamp sets that just makes me smile. First of all because I love country living, and what is more country than an old tractor (oh, how I wish we had one!), or a little boy in overalls? I'm betting he has a frog in his pocket!  And don't even get me going on that barn! There are a lot of old barns around here - in fact we have one! But none are as stately, and in as good of shape as this one.


The detail on this stamp set is just amazing. I think the Stampin' Up! artists outdid themselves with the artwork. I mean, check out the checkerboard pattern near the top of the silo. And the trees behind the windmill; you can not only see each branch, but the tiny lines on the branches! And the windmill.....not just the cross-pieces for support, but a ladder going up! Heartland is a deeply etched red rubber set, available in wood-mount and clear-mount.


Okay, enough waxing rhapsodic (even though I could go on). I was itching to try the new Pinewood Planks Dynamic T.I.E.F. and I was not disappointed! Remember, the trick to using the Dynamic folders is to dampen the cardstock first before running it through the Big Shot. I use a Stampin' Spritzer, giving two or three light sprays, and then wipe off the excess.

Also remember the Big Shot "sandwich" is different, as well. You only need one cutting pad, placed on top of the folder, not the second one underneath. Trust me, if you forget Mr. Big will remind you as soon as you try to put it through. It won't go, so don't try to force it!


I was very pleased that the paper fibers didn't crack and the cardstock came out looking similar to the barn wood on my living room wall. After the Crumb Cake cardstock was embossed, I lightly dragged the Whisper White Craft ink pad across it, to give it a whitewashed look.

Here's the "How To"
 Image: Whisper White 3-1/2" x 4-1/2"
 Mat: Copper Foil 3" x 4"
 Greeting: Whisper White 9/16" x 3"
 Mat: Copper Foil 5/8" x 3"
 Background: Crumb Cake 4" x 5-1/4" (this will be trimmed down)
 Mat: Whisper White 3-7/8" x 5-1/8"
 Card base: Soft Suede 5-1/2" x 8-1/2" scored and folded at 4-1/4"
  1. Lightly spritz Crumb Cake cardstock and emboss with the Pinewood Planks folder. Drag Whisper White Craft ink pad over to "whitewash." Set aside to dry.
  2. Stamp barn scene in Basic Black Archival ink on white cardstock. Add a little shading to the silo and roof with Smoky Slate ink and a blender pen. Sponge Soft Suede ink lightly around edges.
  3. Die cut scene with largest oval in Layering Ovals Framelits. Sponge Soft Suede ink lightly around edges.
  4. Die cut Copper Foil with same oval. Adhere barn scene to foil, having edges slightly offset, as shown.
  5. Stamp greeting on strip and cut banner end. Sponge Soft Suede ink lightly around edges. Adhere copper strip and cut banner end slightly longer.
  6. Cut embossed plank background down to 3-3/4" x 5". Adhere a piece of burlap ribbon to the bottom edge, trimming ends even with cardstock.
  7. Adhere to white mat and then to card base. Stamp "splats" from Timeless Textures in Soft Suede ink, if desired.
  8. Adhere barn to card base. Attach greeting with dimensionals.
  Product List

Sunday, September 18, 2016

First Sight Birthday CAS


More cards for my birthday card stash! These are simple to make, and you can make them in a variety of color combinations to mix things up. I used some of the new In Colors for this batch. Now I'm eye-balling some other color combos, like something with Autumn colors. And maybe instead of the butterfly, have a little cluster of leaves. Hmmmm.......ideas are popping!

Don't forget to check here tomorrow evening for the Fall edition of the Control Freaks Stampers' Tour de Freaks!

Here are the color combinations:
Flirty Flamingo/Watermelon Wonder, Dapper Denim/Marina Mist,
Emerald Envy/Pool Party, Sweet Sugarplum/Rich Razzleberry


Here's the "How To"
 Image panel: Whisper White 4" x 5-1/4"
 Butterfly: Emerald Envy 1-1/2" x 2" and Vellum 1" x 1-1/2"
 Mat: Emerald Envy 4-1/8" x 5-3/8"
 Card base: Whisper White Thick 5-1/2" x 8-1/2" scored and folded at 4-1/4"
  1. Using Pool Party ink, stamp flourish from First Sight and grid from Timeless Textures on image panel. Use Emerald Envy ink to stamp greeting.
  2. Emboss image panel with Pretty Paisleys embossing folder, adhere to mat and then both to card base.
  3. Punch Emerald Envy cardstock with Elegant Butterfly Punch, and Vellum with Bitty Butterfly punch. Adhere vellum butterfly to larger butterfly with a glue dot. Place a coordinating Enamel Shapes heart on top so glue dot doesn't show. Mount butterfly on card with a Stampin' Dimensional cut in half.
  Product List

Sunday, June 12, 2016

Country Livin'


Now here is a subject that is near and dear to my heart! Not only are we finally living our dream of living in the country, but I love old trucks (especially old green ones!), and this one just tickles me. We are sooo in need of a farm truck, because hauling stuff in the utility trailer is a pain in the patoot. But I digress.....

This was one of the cards we made in the Second Saturday Stamp Club this weekend. It's quick to watercolor with an Aqua Painter and the beauty of it is, you don't need to be precise! If you miss a spot, that's okay. If you color out of the lines a bit, that's okay too. It adds character!

Here's the "How To"
Image: Watercolor Paper 2-1/2" x 4"
Mat: Emerald Envy 2-3/4" x 4-1/4"
DSP: 2016-2018 In Color DSP Stack Emerald Envy 2-1/2" x 5-1/2"
Mat behind DSP: Soft Suede 3" x 5-1/2"
Whisper White for greeting 1" x 3"
Card base: Crumb Cake 5-1/2" x 8-1/2", scored at 4-1/4" and folded
  1. Stamp truck on watercolor paper using Basic Black Archival ink.
  2. Color as desired using Aqua Painter and ink squished onto lid of ink pad.
  3. Mat on Emeral Envy mat.
  4. Tear DSP and Soft Suede in random pattern and adhere to card base with bottom edges even.
  5. Stamp splatters in upper corners with VersaMark ink.
  6. Adhere image to card base.
  7. Cut burlap ribbon 5-1/4" long, and cut banner at right end. adhere to card with glue dots.
  8. Stamp banner and greeting on Whisper White, and punch with Duet Banner Punch. Fasten to card with dimensionals.
Product List