Showing posts with label DSP storage. Show all posts

Saturday, December 15, 2018

Organizing! (Again)

It's getting to be that time of year again, where I get the strong urge to make things orderly in my craft room. I know it's an uphill battle, which wouldn't be so bad if I'd quit adding more stuff.
HA....like that is ever going to happen!
I can count on three times a year that there will be new DSP added, and three times a year the old DSP will retire, and I can't bear to part with it. The new Occasions catalog will be out in less than three weeks, and I already have all the beautiful DSP in it and the SAB flyer, so I need to make some room!

https://amzn.to/2LfFdpn

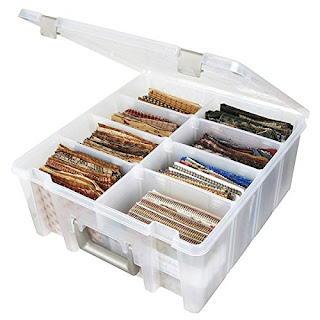
My solution, which I talked about in this post, are these awesome divided ArtBin containers. They hold a ton of DSP that I've cut down to a convenient 4" x 6" size, and separated with labeled dividers.They're even available in several different colors, but I prefer the clear.


I put the name of the DSP at the top of the divider, and then list the coordinating colors for easy reference later. It's especially helpful when colors retire, because I know I'll never remember the names of some of them! Next month I plan to bless the local elementary school with some long-retired paper that I know I will never use. I think I'm ready to say good-bye to some of them. Maybe. I'm sure the teachers can think up something fun for the kids to do with it!

Tuesday, January 30, 2018

Labeled Dividers

When I made the dividers for labeling the DSP in the bins, I took pictures. But then I thought "No one would be interested in this" so I didn't post them. Well, I was wrong, so I'm posting them now! Thank you, Barbara, for asking!

I repurposed the thick white backing sheets that come in the DSP packs. You will be able to cut four dividers (4-1/2" x 6") from each sheet. If the lettering bothers you (I didn't mind, since it would be covered), then you will get three clean dividers.

Here is how I made them tabbed:
  1. I wanted to cut 3" off the divider to make the tab, so I placed a piece of Washi tape on the Stampin' Trimmer at the spot where I wanted to stop the cut.
  2. The divider was placed so the right long edge was at the 3/4" line, then I slid the cutting blade down to the Washi "stop" point.
  3. The excess was trimmed off with Paper Snips.
  4. The Envelope Punch Board was used to punch the "tabs" by sliding the tab edge in to the exact middle of the punch.
  5. This was done on each side.
  6. Then it was simple to label everything with a fine-tip Sharpie!


    Product List