Tuesday, July 28, 2020

12 DAYS OF CHRISTMAS IN JULY (Day 9)

Heart's Delight Cards, Wishes & Wonder, 2020 Aug-Dec Mini, 12 Days of Christmas in July, Stampin' Up!

Only four more days until the end of the month and the end of the 12 DAYS OF CHRISTMAS IN JULY. Time sure flies when you're having fun, 'eh? Today's card highlights the fabulous Evergreen Forest 3D embossing folder and the Wishes & Wonder bundle. (Oh! And a die from a different bundle that will be featured tomorrow, heehee!)

Heart's Delight Cards, Wishes & Wonder, 2020 Aug-Dec Mini, 12 Days of Christmas in July, Stampin' Up!

Isn't that die cut elk just gorgeous? Between him and the embossed trees, the card didn't need anything other than a greeting.

Heart's Delight Cards, Wishes & Wonder, 2020 Aug-Dec Mini, 12 Days of Christmas in July, Stampin' Up!

Note: When you add ink to an embossed piece, be sure to dab off a lot of the excess ink on scratch paper before very lightly (I can't emphasize that enough) rubbing it on the embossing. On the trees, I started at the tops and lightly "polished" down, so more color would be on the tops. It looks like they are peeking through a low foggy mist, doesn't it? Measurements and instructions are below.

Remember, buy any bundle in August from the upcoming 2020 Aug-Dec Mini Catalog, which starts August 4th, and received a pre-cut, ready to stamp and assemble card kit (4 cards and envelopes) from me! The kit will include any die cuts and embossed pieces, as well as embellishments needed to complete the cards. All you need is stamps, ink, and adhesives.

Measurements

  Card base: Whisper White 5-1/2" x 8-1/2" scored & folded at 4-1/4"
  Embossed background: Whisper White 4" x 5-1/4"
  Mat: Shaded Spruce 4-1/8" x 5-3/8"
  Snow mound: Whisper White 1-1/2" x 5-1/4"
  Elk: Bronze Brushed Metallic Cardstock 2" x 3"

Instructions
  1. Emboss Whisper White background with Evergreen Forest folder and using a sponge dauber, lightly burnish Shaded Spruce ink onto treetops (see note above). Adhere to Shaded Spruce mat and then to card base.
  2. Cut snow mound with the die in the Home Together Dies, or freehand cut it with Paper Snips. Stamp greeting with Shaded Spruce ink. Adhere snow mound to card base.
  3. Die cut elk from Bronze Brushed Metallic cardstock. Adhere to card using liquid glue under the legs and Stampin' Dimensionals under the head and body.
Product List

Monday, July 27, 2020

12 DAYS OF CHRISTMAS IN JULY (Day 8)

Heart's Delight Cards, Tree Angle, Stitched Triangles Dies, 2020 Aug-Dec Mini, 12 Days of Christmas in July, Stampin' Up!

Two thirds down, one third to go! Are you getting inspired? I sure hope so! Today's card features the very cute and modern Tree Angle photopolymer stamp set. There are 15 pieces, and they coordinate with the Stitched Triangles Dies found in the 2020-2021 Annual Catalog.

Heart's Delight Cards, Tree Angle, Stitched Triangles Dies, 2020 Aug-Dec Mini, 12 Days of Christmas in July, Stampin' Up!

This is another quick and easy card. The little poinsettia tree is a two-step stamp, and it doesn't need precise placement, thankfully.

Heart's Delight Cards, Tree Angle, Stitched Triangles Dies, 2020 Aug-Dec Mini, 12 Days of Christmas in July, Stampin' Up!

That greeting does make me a little bit sad, though, because I'm not sure we will be able to gather with loved ones by Christmas, the way things are going. Well, we can hope things will be better by then, anyway! Measurements and instructions are below.

Remember, buy any bundle in August from the upcoming 2020 Aug-Dec Mini Catalog, which starts August 4th, and received a pre-cut, ready to stamp and assemble card kit (4 cards and envelopes) from me! The kit will include any die cuts and embossed pieces, as well as embellishments needed to complete the cards. All you need is stamps, ink, and adhesives.

Measurements

  Card base: Whisper White 5-1/2" x 8-1/2" scored & folded at 4-1/4"
  Embossed background: Whisper White 3-3/4" x 5"
  Mat: Real Red 3-7/8" x 5-1/8"
  DSP: Heartwarming Hugs 1-1/4" x 5-1/2"
  Trees: Whisper White 4-1/4" x 5-1/2"

Instructions
  1. Emboss Whisper White background with the Dainty Diamonds folder and adhere to the Real Red mat. Adhere both to card base.
  2. Adhere DSP strip over embossed background, having lower edge about 5/8" up from lower edge of the Real Red mat.
  3. Heat emboss greeting in white on lower left side of DSP.
  4. Stamp trees (Real Red, Garden Green) and tree trunk (Early Espresso). Die cut trees and fussy cut trunk.
  5. Arrange trees as desired and adhere to card - smaller trees with liquid glue, larger tree and tree trunk with Stampin' Dimensionals.
  6. Color Star Designer Elements with a Dark Daffodil Stampin' Blend marker and attach above trees. (I used a tiny piece of a dimensional behind the center star.)
Product List

Sunday, July 26, 2020

12 DAYS OF CHRISTMAS IN JULY (Day 7)

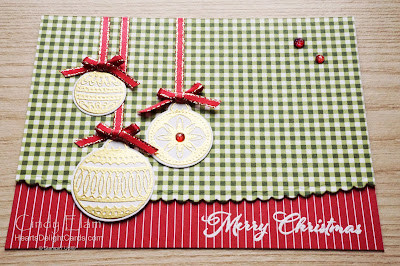
Heart's Delight Cards, Ornamental Envelopes, Envelopes Dies, 2020 Aug-Dec Mini, Stampin' Up!, 12 Days of Christmas in July

Whew, we are past the halfway point, peeps! I hope I don't run out of ideas. (Like THAT will ever happen, not when I have fourteen new stamp sets from the demonstrator preorder, and twelve of them are holiday themed!)
Smiley from Millan.Net

Today's card features the Ornamental Envelopes bundle, which is a 12 piece photopolymer stamp set and the coordinating (also 12 piece) Envelopes Dies. I used the large curved scallop on this card.

Heart's Delight Cards, Ornamental Envelopes, Envelopes Dies, 2020 Aug-Dec Mini, Stampin' Up!, 12 Days of Christmas in July

Traditional Christmas colors are the rule today. Originally I had thought to stamp the ornaments in red or green, but I didn't think they would show quite as well so... gold embossing to the rescue! Red, green, and gold are a lovely combination, too. Measurements and instructions are below.

Heart's Delight Cards, Ornamental Envelopes, Envelopes Dies, 2020 Aug-Dec Mini, Stampin' Up!, 12 Days of Christmas in July

Remember, buy any bundle in August from the 2020 Aug-Dec Mini Catalog, which starts August 4th, and received a pre-cut, ready to stamp and assemble card kit (4 cards and envelopes) from me! The kit will include any dies cuts and embossed pieces, as well as embellishments needed to complete the cards. All you need is stamps, ink, and adhesives.

Measurements

  Card base: Whisper White 5-1/2" x 8-1/2" scored & folded at 4-1/4"
  DSP: Heartwarming Hugs (green check) 4" x 5-1/2", and (red stripe) 1-1/4" x 5-1/2"
  Ornaments: Whisper White 2-1/4" x 4-1/4"

Instructions
  1. Adhere green check DSP to card base placing top edge in alignment with fold. Place long curved scalloped die 3/4" from bottom edge of (OPENED!) card. Make sure both sides are even. It helps to use a couple sticky notes to hold the die in place. Run through die cut machine.
  2. Adhere red stripe DSP to inside of card at bottom edge. Heat emboss greeting in white on lower right. (Greeting is from Cherish the Season - use whatever fits.)
  3. Stamp ornaments using VersaMark ink and heat emboss in gold. Use the matching die to cut them out, reserving the three largest ornaments.
  4. Tie three teeeny, tiny bows with the red ribbon. *grin* 
  5. Arrange the ornaments as desired to see where to place the strips of ribbon. Adhere ribbons in place, then ornaments on top. Use glue dots to adhere bows.
  6. Add Wonderful Gems to complete the card.
Product List